Home Inspection Certification

Home Inspector Licensing

The Ontario Government is promising to introduce legislation this fall to require licensing for “HOME INSPECTORS“.  The initial legislation to license home inspectors was lost when the Ontario Government decided to Prorogue parliament causing any pending legislation to be discarded.  The Ontario Government has stated that they will re-introduce Home Inspector licensing this fall, hopefully the eventual licencing of home inspectors will be completed in a timely manner.   Many groups and organizations have invested time and resources to ensure a comprehensive level of qualifications will be required to obtain a Home Inspection License.

Currently it is proposed that an Independent Administrative Authority would be created to establish to enforce the legislation and any required elements. This will ensure a minimum standard is set for home inspection reports, wording of contracts, inspection performance and any disclosures required.  Although no mention has been made of the relationship between home inspectors and real estate agents, hopefully they will address any issues related to Realtors trying to influence the home inspection process.

The home buyer will benefit from a standardized inspection process by someone who has the required qualifications and training to perform a professional home inspection. When a home buyer is making such a large financial decision it is only fair that he can rely on the expertise of the person hired to inspect his home.  Inspecting a home involves some expensive items such as roofs, electrical wiring, plumbing, structure and foundation inspections.

Understanding the knowledge a professional home inspector requires is a good first step to knowing who you should hire to inspect your property.  To be a knowledgeable and professional home inspector you must be a fully trained Certified Barrie Home Inspector generalist and able to understand how the building systems/components found in a home perform and wear out over time. These systems include items such as: structural components, exterior components, roofing, plumbing, electrical, heating, air conditioning, interior, insulation and ventilation. That’s why it’s so important to receive proper training/education and continue your education to stay abreast of the continuing changes in building requirements.  The Ontario Building Code will usually have a major update of building codes every five years and some yearly changes, all which can affect the results of your home inspection.   Is your home inspector up to date on his training and knowledge ?

After 4 years of Home Inspection licensing in B.C. the president of CAHPI had this to say about the affect of licensing on their home inspection industry:

“Therefore, under-trained and under-qualified individuals were being supplied with B.C. licenses, and able to enter people’s homes and provide assessments on a condo, a house, or a property, so long as they promised to get training and education at some future date. The shame is that the very people that B.C. government licensing was supposed to protect consumers from were being licensed through a loophole in the licensing regulation that has now allowed yet another out of province licensing body.”

We can only hope that Ontario has taken heed of the problems that B.C. and other provinces have encountered and avoid the same mistakes when setting up Ontario’s licensing process.  I think everyone always views Government Intervention with some trepidation,  we know the costs of home inspections will go up due to added government fees and possible new membership requirements.  Hopefully the newly created Home Inspection Board will come under the watchful eye of the Ontario Ombudsman, which will definitely bring some transparency to the process and ensure a level playing field for all.

The home buyer will end up being the “winner” if this process works,  and everyone should work hard to ensure the home buyer and his investment is always protected.

For any information regarding home inspections please contact The Barrie Home Inspector

Barrie Home Inspections Professional Training & Qualifications

Free Thermal Imaging with every Home Inspection

We can only hope that Doug Ford, as the new premier of Ontario will move this valuable consumer protection legislation forward.  Ford failed to do this.

The latest update is that the Provincial Government will run licensing but the Home Inspection industry will have to pick up 100% of the costs.  Initial estimates put the Licensing Fee at around $2,300.00 per inspector if they all join.   Unfortunately this is not realistic as Government always increases staff and costs while doing any administrative duties.   Hair dressers for example had their licensing fees TRIPLE  about 5  years ago,  and that is just to obtain a Certificate.

Landscaping Tips

Home Inspections – Building Department

Every new home constructed is required to go through a rigorous design process, which normally includes a plan of subdivision.  The plan of sub division is the proposed layout of all roads, sidewalks, ditches and more importantly to home owners,storm water control and hydro geological study.  This initial study should ensure when you buy your new home that your basement should not be affected by pooling water or unusual drainage issues.

Your municipality or city Building Department is required under the Ontario Building Code to perform mandatory inspections of your new home.  Your Building Department is paid for these inspections by fees levied by issuing a Building Permit.  A list of what is typically required to be inspected follows, also included are the common issues I have found when inspecting this various items during a home inspection or experienced when building homes:

Footing –  Footing are to be constructed on undisturbed soil or soil that has been compacted.   If ground is “deemed” to be wet then footing size is doubled.

Back Fill –  Only clean fill is supposed to be used to backfill your foundation.  Many builders will bury building debris while back filling foundation.

Framing – Joist hangers are supposed to be completely nailed ( all holes used ) using “rated nails” which usually are stamped on nail head.

HVAC Rough in – Substantial completion of ductwork and piping.

Insulation – Completion of insulation and vapour barrier.  Many times trades will remove insulation and vapour barrier and neglect to replace when job is completed.  Attic insulation is often not installed evenly and areas of low insulation can exist.

Fire Separations –  Many times drywall tape is falling off seams due to poor installation.

Water Supply and Plumbing –  Some plumbers will install clean out above floor grade creating a trip hazard.

Final Interior Inspection – Doors, windows, floors, walls, ceilings and fixtures are inspected.

Final Exterior Inspection –  This is where many times I find new homes with no Ice or Water Shield installed under shingles.  The roofer saves himself $300 to $500.00 in materials because he knows the inspector will not go up to the second floor on a ladder and check shingle installation.

Occupancy Permit is Issued.

Personally I think any time you find a issue in your new home that should have been caught by your local Building Department, you should contact them to ask for re-inspection.  They are specifically trained to inspect the construction of your home and legally not permitted to inspect any construction beyond the scope of their learning.  As a home buyer you pay for the cost of these inspections and as the end user should expect your home to be free of obvious defects.

Buying older Homes

When you buy an older home that has been renovated you should ensure all work was done with a Building Permit and the proper inspections were completed.  If you purchase a home that has been renovated and no permit was issued,  you will then assume responsibility for any subsequent work that may be required to bring your home up to the required standards.  This can be particularly expensive if structural, plumbing or electrical work is involved.

Free Thermal Imaging in Barrie


Free Thermal Imaging Scan with Home Inspection

The Barrie Home Inspector offers a Free Thermal Imaging Scan with every home inspection.  This includes all exterior walls and ceilings of the home.  infrared imaging can help you save hundreds, even thousands of dollars per year by detecting moisture, insulation and electrical issues before they pose a bigger risk to your property, fiscal or personal well-being.

Thermal imaging cameras detect radiation in the infrared range of the electromagnetic spectrum (roughly 9,000-14,000 nanometers or 9-14 m) and produce images of that radiation, called thermograms. Since infrared radiation is emitted by all objects above absolute zero according to the black body radiation law, thermography makes it possible to see one’s environment with or without visible illumination.

Thermal Imaging – Infrared Spectrum

Thermal Imaging - Infrared Spectrum


Thermal Imaging – Non-Destructive Testing

Thermal imaging is a non-invasive, non-destructive way of evaluating conditions below the surface.  Thermal imaging gives a professional home inspector the ability to see beyond the normally visible. The amount of radiation emitted by an object increases with temperature; therefore, thermography allows one to see variations in temperature. When viewed through a thermal imaging camera, warm objects stand out well against cooler backgrounds.

A thermal imaging camera consists of five components: an optic system, detector, amplifier, signal processing, and display. The thermal imaging camera employs a series of mathematical algorithms. Since the camera is only able to see the electromagnetic radiation that is impossible to detect with the human eye, it will build a picture in the viewer and record a visible picture, usually in a JPG format. This picture is included in the report so the client can make an informed decision with all the available information.

During Energy Audits, Infrared Cameras are especially useful when conducting an Infrared Inspection of an attic or hot roof, “thermal by-passes” are located and can be identified for correction to stop the heat loss. Locating Air Infiltration Points – Along with a “Blower Door” the sources of air infiltration and drafts can be pinpointed. Where cold air comes in, and heat escapes; costing you money! The IR camera helps us identify those locations in association with the blower door. Infrared thermal imaging scans can easily verify insulation inside walls and ceilings. The camera will reveal where there is missing, settled, or wet and damaged insulation. As an added benefit, when we scan your home, we can also identify where cold air is coming through your walls.

Thermal Imaging – Moisture & Mould Detection

Mould, mildew and moisture detection are some of the common tasks that thermal imaging is used for during a home inspection. Where there is moisture, there is “evaporative cooling”. With the use of the IR camera, we can identify areas of moisture and potential breeding grounds for biological growth. Thermography or infrared detection is the leading tool in diagnosing water damage.  Whether you are concerned about wasted high energy costs, leaks, smells or quality assurance Thermal Imaging can help identify potential problems.

Why Use Thermal Imaging

Inspecting commercial and residential  homes using a thermal imaging camera is a powerful and noninvasive means of monitoring and diagnosing the condition of buildings. Thermal imaging technology has become one of the most valuable diagnostic tools for building inspections. A thermal imaging camera can identify problems early, allowing them to be documented and corrected before becoming more serious and more costly to repair.

Thermal imaging is also used for locating and identifying building failures, seeing what the normal eye cannot see. On a thermal image, problems are identified by changing colours. A thermal imaging camera is the one tool that can let you see it all.  The Barrie Home Inspector was the first Home Inspector in Simcoe County to offer Thermal Imaging to his clients.

Air Conditioner Basics

Air conditioning is not simply the cooling of air.  Air conditioners use refrigeration to chill indoor air, taking advantage of a remarkable physical law: When a liquid converts to a gas (in a process called phase conversion), it absorbs 
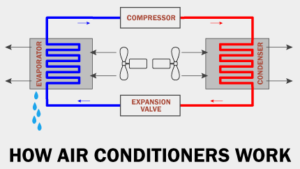
heat. Air conditioners exploit this feature of phase conversion by forcing special chemical compounds to evaporate and condense over and over again in a closed system of coils. Air conditioning involves many aspects of conditioning or changing the air in whatever way in order to make the living environment for the occupants of a building comfortable.  This may include warming the air, cooling the air, adding moisture, dehumidifying the air, filtering the air, and maintaining a balanced distribution or circulation of the air.

Humidity refers to the water vapor or moisture content in the air.  Water vapor is actually steam at low temperatures and low pressures.  Air can carry water vapor, depending on its temperature.  When air absorbs moisture (when it is humidified), the latent heat of evaporation must be supplied from the air or by something else.  When moisture from the air is condensed, the latent heat of condensation is recovered.  Air is referred to as saturated when it is carrying the maximum water vapor that it can hold. We are very sensitive to humidity, as the skin relies on the air to remove moisture. The process of sweating is your body’s attempt to keep cool and maintain its current temperature. If the air is at 100-percent relative humidity, sweat will not evaporate into the air.

Dehumidification is the removal of moisture from the air.  A dehumidifier is a device that removes moisture from the air.  Dehumidifying is accomplished by condensation, which takes place when the temperature of the air is lowered below its dew point.

Gas-Compression Cooling

Gas-compression cooling involves the compression and expansion of refrigerant gas and the transfer of heat.  Heat is removed from the interior air and is released outside.  Heat is simply transferred from one place to another.

A gas-compression cooling system consists of the following components:

  • the compressor;Parts of Air Conditioner
  • the condenser coil;
  • the expansion device;
  • the evaporator coil; and
  • fans.

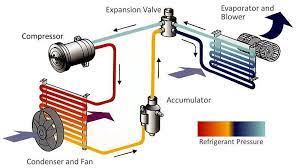
The compressor acts as a pump and pushes the liquid refrigerant through the liquid line to the expansion device.  The liquid refrigerant is under high pressure in the liquid line.  The expansion device is located at the evaporative coil.

The expansion device controls the flow of refrigerant into the evaporator coil.  The device can be an expansion valve or a capillary tube.

As the high-pressure liquid refrigerant is forced through the expansion device, it expands into a larger volume in the evaporator coil.  When it expands, its pressure is reduced and its boiling temperature is lowered.  Under this low pressure, the liquid refrigerant boils until it becomes a vapor.  During this change of state, the refrigerant absorbs heat from the warm indoor air flowing across the evaporator coil.

After the refrigerant has boiled or vaporized, the vapor moves out of the coil to the outdoor condenser unit through the suction line and enters the compressor.  The compressor compresses the refrigerant vapor, increasing its temperature and pressure.  The compressor pushes the vapor along the condenser.

At the condenser, the hot vapor is cooled.  It is cooled by the outdoor air being blown through the coils of the condenser.  When the air passes through the coils, it absorbs some of the refrigerant heat.  The heat is transferred from the refrigerant in the coil to the air passing through.

The temperature of the air blowing out of the condenser increases, and the temperature of the refrigerant vapor decreases until the vapor is cooled to its saturation point.  At that point, the vapor condenses into a liquid.

This refrigerant liquid is still under high-pressure.  It is pushed to the expansion device (valve or tube) and the cycle continues.

Cold is never created in this type of air-conditioning system.  Instead, heat is transferred from one place to another.  Heat is absorbed from the interior air, moved outside, and released to the outdoor air.  When heat is absorbed from the interior air, the air temperature is cooled.

Condenser

In a typical air-conditioning split system, the condenser unit (or outdoor coil) is located outside.  A condenser condenses or liquefies gas by cooling it.  When the condenser is running, hot refrigerant gas coming from the compressor enters the condenser coil at the top.  As it passes down through the condenser coil, it cools. The compressor is located inside the condenser unit.

The condenser can be a plain tube design, finned tube, or plate-type.  It can be a series-pass or parallel-pass type.  Condenser units can be air-cooled (the most common for residential installations), water-cooled, or a combination of the two.

An air-cooled condenser is made up of a coil that air blows across to cool the hot gas that’s passing through the coil.  There is a fan inside the condenser that pushes the air through the coil.  Heat is transferred from the hot gases that are moving in the coil to the air passing through the coil.

If you put your hand in the path of the air blowing out of an operating condenser, it should feel warm.

Air-cooled condensers must be maintained and kept clean and free from debris and damage.  The fins on the condenser coils can be easily damaged and bent.  Damaged and bent fins can block the air flow through the condenser coil.  A fin comb is an implement that can be used to straighten the fins back to their original position.

Evaporator

An evaporator is sometimes called an evaporator coil, cooling coil, and indoor blower coil.  In a typical residential air-conditioning system, the evaporator absorbs the heat energy from the air passing through it.  It transfers the heat energy from the passing air to the refrigerant moving inside it.  As the liquid refrigerant absorbs the heat, it is boiled off or evaporated as it moves through the evaporator.  The house’s air temperature drops as it passes through the coil, pushed by the blower fan.

Evaporators are usually made of copper tubing with closely spaced aluminum fins.  There are about 14 aluminum fins per inch of copper tubing.  This type of finned coil provides a very good surface area for transferring heat.  Some coils are made of aluminum tubing, which does not last as long as copper tubing.

The evaporator coil is sometimes called an A-coil because some are shaped like the letter A.  Some coils are called slab coils because they appear like a slab tilted at an angle.  Coils have a condensate tray underneath to catch the condensate water draining off the coil.

Similar to the condenser, the evaporator coil must be maintained and kept clean and free from dirt, dust and damage.

Refrigerant

A refrigerant is a substance that absorbs heat as it expands or vaporizes.  A good refrigerant has a low boiling point and functions with a positive pressure.

The two most commonly used refrigerants in older air-conditioning systems are R-12 (Freon® 12) and R-22 (Freon® 22).  R-12 has a boiling point of -21.8° F at atmospheric pressure.  R-22 has a boiling point of -41.4° F.

R-410A is replacing those older refrigerants because it does not deplete ozone.  R-410A can be recognized by its various trade names, including Genetron® AZ-20®, DuPont™ Suva®, and Puron®.

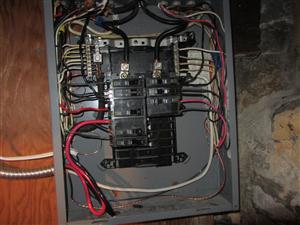
Electrical Disconnect

According to modern standards, air-conditioning condensing units and heat pump units should have a readily accessible electrical disconnect within sight of the unit as the only allowable means. The disconnect is allowed to be installed on or within the unit, but it should not be located on panels designed to allow access to the unit.

 Inspection

The Barrie Home Inspector does not inspect air conditioner units when outside temperature is below 65 degrees F.  There is a possibility that the refrigerant may not completely vaporize and liquid would then enter compressor which may damage unit and which will then require replacement.  This information will be noted on your home inspection report.

Soffit Baffles Protect Your Attic

Soffit Baffles Protect Your Attic from Mould & Moisture

Soffit baffles, or rafter vents, are an essential part of keeping your home well-ventilated and reducing the moisture on top of your house. Soffit Baffles prevent vents from getting clogged by insulation and ensure a clear channel forSoffit Baffles for Attic outside air to move into the attic through soffit vents.If you want a well-ventilated attic that doesn’t regularly grow mold for you to remove, you’ll want to make sure your home is properly aired out.

Even well-insulated attic spaces require air circulation. That means drawing air in from outside the home and allowing it to push through the attic. Baffles provide a channel for air to flow through certain parts of the attic. Baffles are also called wind baffles, venting chutes, rafter vents or insulation baffles. Typically made from polyvinyl chloride, rigid foam board or cardboard, they can be installed with a few staples.While there are many projects for your roof that professionals should handle, attic venting baffles can be installed by anyone. This makes it a perfect home improvement project for those who love caring for their home themselves.

Roof turbines used to be very popular for venting the upper section of your attic.  Most professional roofers do not use these any more as the are known for allowing rain and snow to enter your attic.  Typically a mushroom type of vent or with louvers, which do not allow snow and water in, are used today.   When I pull up to a home inspection the first place I look at is the roof, if there are newer shingles and old style turbines I know that I am going to find issues with the workmanship involving flashings, nailing and caulking.

When you are faced with installing new shingles, which is about every 15 years for fiberglass shingles, ensure your contract specifies whether you are getting new vents, flashings, valleys and cover flashing or just reusing existing material.

Natural Attic Ventilation

Many home owners do not understand why anyone would allow cold air to enter the attic through vents, cold has alwayes been associated with poor insulation.  During the winter months allowing a natural flow of outdoor air to Ice Dam on Roof ventilate the attic helps keep it cold, which reduces the potential for ice damming (snow that melts off a roof from an attic that is too warm and then re-freezes at the gutters, causing an ice dam that can damage the roof). Proper insulation and air sealing also keeps attics cold in winter by blocking the entry of heat and moist air from below. In the summer, natural air flow in a well-vented attic moves super-heated air out of the attic, protecting roof shingles and removing moisture. The insulation will resist heat transfer into the house.

Attic ventilation works on the principle that heated air naturally rises, primarily utilizing two types of vents:

  • Intake vents, located at the lowest part of the roof under the eaves, allow cool air to enter the attic.
  • Hot air exhaust vents, located at the peak of the roof, allow hot air to escape.

Taking advantage of this natural process, referred to as passive ventilation, is the most common way to vent an attic. In order to facilitate this exchange of warm and cool air, the general rule of thumb suggests installing at least 1 sq. ft. of vent for every 300 sq. ft. of attic floor. Building codes vary, though, so do check with your local building authority for the specifics that pertain to your community.

Older Homes Soffit Vents

Just because you have vented aluminum soffit installed around your home does not always mean you have good ventilation.  Many times home renovators may install the vented soffit over existing wood soffit without installing any ventilation holes.  Most contractors will rip a strip of plywood along the entire soffit area to ensure fresh air can enter your attic.  If you are unsure of whether your soffit is working as it should, just take a powerful flashlight and put it up to your soffit while someone looks in the attic to see if any light penetrates into the soffit.  If there is no light then there is no venting.

Venting Roof of Finished Area

Rafter vents, or insulation baffles, install in any rafter space to create narrow gaps that direct fresh air from the soffit vents to the peak of the roof. These specialty vents do not affect the finished look inside the remodeled attic. Instead, fresh air still flows in through the soffit vents and travels along the underside of the sheathing until it reaches a ridge vent or can be vented with another type of exhaust vent


Barrie Home Inspector Maintenance Tips

Barrie Home Inspector Maintenance Tips
Electrical Service Boxes

Electrical Service Boxes

Electrical Service Boxes The service box includes a circuit breaker which can be used to shut off all the power in the house, or a switch with a handle located on the outside, and the service fuses inside. The cover on the service box is often sealed by the utility. ...

read more
Deck Collapse Is Your Deck Safe?

Deck Collapse Is Your Deck Safe?

Safety Alert: Study Reveals Sharp Increase in Deck Failures A landmark study reveals that there have been 179 reported deck collapses from January2000 through December 2006, killing 33 and injuring 1,122. By: Michael Morse, Brittney Corwin, Robert Morse and Andrew...

Toronto Commercial Building Inspection

Toronto Commercial Building Inspection The advantage of hiring a Commercial Building Inspector will allow you to understand the true condition of the building you are contemplating purchasing.  The exterior and cosmetic finishes of a building never tell the...

Barrie Home Inspections Maintenance Tips

Barrie Home Inspections provides valuable advice and tips for home owners wanting to improve and protect their investment.  Every home requires maintenance and ignoring simple yearly tasks can lead to very expensive repairs in the future.  Our maintenance defect pictures provide graphic examples of the damage that can be done to your home when maintenance is ignored.  A quick inspection of your home will alert you to areas of your home that need simple maintenance repairs, ignoring these will cost you in the future.

Asphalt Shingles

Asphalt Shingles

Asphalt Shingle Information Asphalt shingles have been largely replaced by Fiberglass Shingles which are the most common shingle material now  used. The shingles consist of fiberglass base coated  and covered with granular material. In 1960...

Protecting Your Brick

Protecting Your Brick

 Protecting Your Homes Brick.  Brick veneer is a porous material which exposed to a constant source of moisture will absorb it.  Both air and water can penetrate brick veneer. Moisture can do a great amount of damage to your homes brick, typically by...

WETT Inspections Barrie

WETT Inspections Barrie

Most problems with Fireplaces and Wood Stoves originate from not being properly inspected.  The masonry chimney is the one item that is prone to damage, from overheating or moisture penetration.  Water damage is the worst culprit when it comes to chimney...

Pex Plumbing Problems

Pex Plumbing Problems

Pex Plumbing—an acronym for cross-linked, polyethylene water supply piping. The new piping system used essentially plastic piping to carry water into and through the new home. To connect the plastic (PEX) piping, the piping system also notably used brass fittings and...

Buyer Beware – Why You Need a Home Inspection

Buyer Beware – Why You Need a Home Inspection

Over the course of the past fifteen years I have come across many homes which have had problems that would scare any rational buyer away.  Unfortunately not all buyers have a home inspection and find out the hard way about the true condition of their home....

Truss Uplift

Truss Uplift

Pre-engineered roof trusses provide the frame for your roof system. These trusses are usually fabricated from 2-by-4 lumber into a shape that resembles a triangle with the letter W inside of the triangle.  Trusses spread your roof load to exterior walls which is...

Alliston Home Inspector

Alliston Home Inspector Provides “Peace of Mind”

After performing over 8,000 home inspections one thing sticks out clearly about buying homes,  and that is no two homes are alike.  Different builders, quality of building materials, age of house and renovations can make all the difference in the quality of your home.

The-Alliston-Home-Inspector 


Is that house really a bargain?  Beautiful basement, but what is really behind those walls and above that ceiling?  These are some of the items that an experienced home inspector can tell you. The basement of a home tells the true story about maintenance, building permits and possible illegal wiring or plumbing.

Home Buying Tips

When buying a new home you only have to watch out for defective products and poor workmanship,  all done by tradesmen who are sub-contractors of the builder.

When buying an older home you have to worry about shoddy and unsafe workmanship, especially if any renovations have been done.

Any plumbing, electrical or structural deficiencies immediately raise a Red Flag which indicates that work has been done without obtaining the required Building Permit.   Even if the work looks well done you will be on the hook for any future issues that may arise.

Some home owners like to work with metal studs when framing a basement but they don’t want to pay for the proper electrical fittings required when you use metal studs.  This could affect the safety of you and your family if the entire metal wall structure becomes energized.

Another common electrical deficiency is electrical outlets with “Reversed Polarity”.  This can also affect the safety of your family if small or handheld electrical appliances are plugged into faulty outlet.

Do it yourself roofers are another hazard home buyers want to be aware of.  I recently inspected a waterfront property during a period of heavy rain.  The inspection lasted as long as it took to open the front door.  The water was pouring through the wood ceiling and leaking down through the floor.   The buyer locked the door and we left.  The owners home insurance would probably not cover the water damage due to a Do It Yourself roofing project.

Don't Buy a Money-Pit 


Thermal Imaging Inspections

When I walk into a home which has just been “Freshened Up” for sale, the first thing I look at is the installation of the laminate flooring.  I look at door corners and entrances to see how the laminate was installed.  Then the paint tells a story, how was it put on and does it cover the previous colour.  Kitchen counter tops are sometimes refinished with an “out of the box” product, cupboard doors are usually repainted etc.  This are typically rental properties that are put on the market and a quick sprucing up is applied to give better appeal.  Lipstick on a Pig is my view of these homes.  Everything is cosmetic with no real upgrading or professional repairs being made.

When you are buying a home between 15 and 20 years old there are some items that will soon need replacement if not done already.  Typically your furnace will be at the end of its predictable service life,  the roof will need replacing and your windows could be at an age where the thermal seals will start leaking.  Most home sellers will do the upgrades prior to selling to add value to their property, but if not you should be aware of future expenses that you may be incurring.

The Alliston Home Inspector is a Certified Building Code Official with the Ontario Building Officials Association,  a Certified Master Inspector,  was a Registered Builder with HUDAC and has over 20 years of actual home inspection experience.

View of hidden moisture detected with Thermal Imaging Camera.  Without the use of an Infrared Camera this moisture would have gone undetected.  Free Thermal Imaging with every home inspection.

Infrared technology can help find missing insulation and moisture intrusion.  Older homes tend to have many areas where insulation was not installed or has shifted over time and is now allowing cold air to enter your home.

Every Home Inspection comes with a 100% Money Back Guarantee – Good for 30 days after you move into your new home.

Call the Alliston Home Inspector at 705-795-8255 or Toll Free at 888-818-8608

Email Roger

Articles You May Enjoy

Home Inspectors Barrie Ontario
Midland Home Inspector
Home Inspector Midland
Home Buyers Guide
Inspecting Oil Tanks – TSSA

WETT Inspection Information

Innisfil WETT Inspections
Flue Pipe Installation
WETT Certified Inspection – Floor Protection
WETT Certified Inspection – Flue Pipes
WETT Inspection for Insurance

Inspections

Pre-Delivery Inspections
Pricing Policy
Privacy Policy
Types of Inspections
Roof Inspection
Home Inspection Certification

Basement Exit Window

Basement Window Exit Requirements

Where a basement exit window is required confuses many people with many different thoughts on what is acceptable. Although I have written a number of articles on this subject I still come across Realtor’s who will offer their opinion on Requirements for Basement Windows based on “hearsay” vs the facts of the Ontario Building Code.  This type of confusion is encountered a lot when individuals, without any formal training, start advising home buyers on Building Code requirements when purchasing a home.

The biggest mistake I find people make is stating that each bedroom requires an “EXIT WINDOW”.  This is simply not true.  Although there are  requirements for light and ventilation, this is not part of exit requirements.  ( National Building Code does require a window in each bedroom )

The requirement for a properly-sized bedroom window has been around since 1980 and subsequent code changes since then have made it even easier to understand how a bedroom egress window is defined. As with any building project, a proper building permit is required and your drawings will be required to show location and size of windows. There is always some interpretation involved in Ontario Building Codes and Fire Codes, so to be safe consult with the Inspection Department and Fire Department prior to starting construction.

Basement Bedroom Exit Window – National Building Code
The National Building Code of Canada (NBCC), on which the Provincial Codes are based, has very clear requirements as it relates to bedroom windows and how the bedroom window serves three distinct purposes in the home:

  1. Light (at least five per cent of the floor area served)
  2. Ventilation (at least 0.28m² or 3 ft² or an adequate year-round mechanical ventilation)
  3. Emergency Escape: An Emergency Escape requires that each bedroom must have a door that leads directly to the exterior of the building or have a properly-sized egress window that can be opened from the inside without the use of keys, tools, hardware or special knowledge (unless this bedroom has a sprinkler system installed).

Ontario Building Code article 9.7.1.2. establishes the general requirement that all bedrooms must have at least one window that is large enough to be used as an exit in an emergency. The specific requirements are as follows:

  1. Except where the suite has a sprinkler, each bedroom or combination bedroom shall have at least one outside window or exterior door operable from the inside without the use of key, tools or special knowledge and without the removal of sashes or hardware.
  2. The window referred to in Sentence (1) shall provide and unobstructed opening of not less than 0.35 m² (542 in² or 3.8 ft²) in area with no dimension less than 380 mm (15 inches), and maintain the required opening during an emergency without the need for additional support.
  3. If the window referred to in Sentence (1) is provided with security bars, the security bars shall be operable from the inside without the use of any tools or special knowledge.

If a window well is required, it must be out from the window at least 550mm (about 22″) to provide safe passage. Awning style windows for example opening into a window well typically won’t work because they tend to obstruct clear passage unless the window well is unusually large.

It is further recommended that the bottom of any egress window opening or sill not be higher than 1.5m (5 feet) above the floor. Now this can be somewhat challenging for any bedroom in a basement, so some means of built-in furniture below the window to assist in the event of an emergency is required.

Egress Windows or Doors for Bedrooms (9.9.10.1)

  1. Except where a door on the same floor level as the bedroom provides direct access to the exterior, every floor level containing a bedroom in a suite shall be provided with at least one outside window that,
    1. is openable from the inside without the use of tools,
    2. provides an individual, unobstructed open portion having a minimum area of 0.35 m² (3.8 ft²) with no dimension less than 380 mm (15 inches), and
    3. maintains the required opening described in Clause (b) without the need for additional support.
  2. Except for basement areas, the window required in Sentence (1) shall have a maximum sill height of 1,000 mm (39 inches) above the floor.
  3. When sliding windows are used, the minimum dimension described in Sentence (1) shall apply to the openable portion of the window.
  4. Where the sleeping area within a live/work unit is on a mezzanine with no obstructions more than 1,070 mm above the floor, the window required in Sentence (1) may be provided on the main level of the live/work unit provided the mezzanine is not more than 25% of the area of the live/work unit or 20 m², whichever is less, and an unobstructed direct path of travel is provided from the mezzanine to this window.
  5. Where a window required in Sentence (1) opens into a window well, a clearance of not less than 550 mm (22 inches) shall be provided in front of the window.
  6. Where the sash of a window referred to in Sentence (5) swings towards the window well, the operation of the sash shall not reduce the clearance in a manner that would restrict escape in an emergency.
  7. Where a protective enclosure is installed over the window well referred to in Sentence (5), such enclosure shall be openable from the inside without the use of keys, tools or special knowledge of the opening mechanism.

The required window size for egress is the same between the National Building Code and the Ontario Building code. Window well requirements are the same as well.

The NBCC details specific size requirements as:

Windows referred to above shall provide unobstructed openings with areas not less than 0.35 m2 (3.8ft2), with no dimension less than 380 mm (15 in.). To ensure the unobstructed opening meets these criteria, you should measure between the sashes, jambs, sills, and opening mechanisms.

The significant difference between the National and Ontario codes is that a means of egress is required for each bedroom with the National Building Code, while only one means of egress per level is required with the Ontario Building Code. Also, the National Building Code requires the sill height from the floor to be no more than 1,500 mm (59 inches), while the Ontario Building Code requires the sill height to be no more than 1,000 mm (39 inches).

Check with your Building Inspection Department

Before starting any renovation project it is always best to check with your local Building Department for required permits and drawings.  You can also obtain advice on what you can legally do or not do.  When renovating it is always better and safer to follow required practices rather than having to redo work or create an unsafe environment for your family.

This information on Basement Window Egress Requirements is brought to you by Canada’s Largest Quit Smoking Directory.

Electrical Service Boxes
DIY Electrical Problems in Home 
Self Test GFCI Receptacles
Aluminum Wiring in your Home
Common Problems found During Home Inspections
Basement Bedroom Exit Requirements  (  most people get this one wrong )

Hiring a WETT Certified Inspector

WETT Inspection Barrie is available 7 days a week for your convenience.  Call Roger today  705-795-8255

Wett Certified for Over 20 Years

Articles You May Enjoy

Home Inspectors Barrie Ontario
Midland Home Inspector
Home Inspector Midland
Home Buyers Guide
Orillia

WETT Inspection Information

Innisfil WETT Inspections
Flue Pipe Installation
WETT Certified Inspection – Flue Pipes
WETT Certified Inspections for Barrie, Alliston and Orillia
Barrie WETT Inspections

Inspections

Pre-Delivery Inspections
Pre-Listing Inspection
Pricing Policy
Privacy Policy
Types of Inspections

Wasaga Beach Home inspector

TSSA Above Ground Fuel Tanks

Property owners have a legal responsibility to maintain fuel oil storage tanks and to clean up any leaks or spills that may occur, whether the fuel oil tanks are situated underground, in a basement or above ground. Fuel oil leaks and spills can cause significant environmental damage and the costs to clean up contaminated soil and groundwater on the property and its surroundings can be extensive.

This legal responsibility and potential for legal liability has resulted in increased insurance claims made by property owners with underground fuel oil tanks. This has caused an increase in homeowners’ insurance concerns, including potential denial of coverage.

The most commonly used tanks for fuel oil are steel containers that hold about 1,000 liters of fuel. The problem with many metal fuel oil tanks is that they rust from the inside out as a result of condensation accumulation inside the tank over several years. It is difficult to tell if a tank is leaking and underground fuel oil tanks present a particular concern because of the inability to determine their condition (they are difficult to inspect) combined with the probability that they will leak (the older the tank; the stronger the likelihood that it will leak).

Fuel Oil Regulations and Codes

Ontario has strict regulations and codes governing the handling and storage of fuel oil that require registration of all existing underground fuel oil tanks and dictate their removal or upgrading according to a phased in four year schedule based on the age of the tank.

All underground fuel tank systems that have not been used for two or more years (and no longer intended to be used), must be removed, no matter what the age. Furthermore, all underground tanks over 5,000 liters are required to be leak tested annually (at least monthly, when level 2 or level 1 leak detection is used).

All existing above ground and underground fuel oil tank systems are required to undergo annual maintenance (maintenance should also be in accordance with manufacturer’s instructions) and to have a comprehensive inspection at least once every ten years. The handling and storage of fuel oil is governed under the Technical Standards and Safety Act – Ontario Regulation 213/01 (“Fuel Oil Regulation”), and administered under the Ontario Installation Code for Oil Burning Equipment I (Based on CSA B139, with Ontario Amendments), Edition/2006 (“Ontario Fuel Oil Code”).

The Fuel Oil Regulation defines two types of fuel oil storage tanks and a tank system:

Above ground tank – “means a tank that is installed at or above grade level within a building or within a secondary containment, but does not include a tank that is in direct contact with backfill material”. Free standing fuel oil tanks in basements that are not in direct contact with backfill material are considered, by the TSSA, as above ground tanks.

Underground tank – “means a buried tank or partially buried tank that is in direct contact with earth or backfill”. The TSSA does not consider fuel oil tanks that are in basements to be underground tanks unless they are in direct contact with backfill material. Tank system – “means an above ground or underground tank, and includes all piping, valves, fittings, pumps and other equipment associated with the tank”.

Underground Fuel Oil Tanks

Under the Fuel Oil Regulation fuel oil distributors cannot supply fuel oil to an underground tank unless the tank is registered with the TSSA. This requirement has been in effect since May 1, 2002. There is no charge for registering an underground fuel oil tank and the application form (Application for an Ontario Registration to Operate/Install and Underground Fuel Oil Tank, Form No. 09143) is available by calling the TSSA 416-734-3300 or toll free at 1-877-682-8772 or online through the TSSA at http://www.tssa.org/regulated/fuels/fuelsForms.asp.Once the application form is processed, the applicant will receive a registration number from the TSSA. The registration number can then be provided to the fuel oil distributor, to ensure an uninterrupted supply of fuel oil.

Deadlines for Removal or Upgrade of Underground Fuel Oil Tank Systems

The requirements for removal or upgrade of underground fuel oil tank systems are set under the Ontario Fuel Oil Code. Removal – All existing single-wall steel underground tank systems that are 25 years old and more as of October 1, 2001, or of unknown age, and not cathodically protected, are required to be withdrawn from service and removed. All underground fuel tank systems that have not been used for two or more years (and no longer intended to be used), must be removed, no matter what the age. However, where removal of the tank is not feasible an application for Variance may be made to the TSSA.

Removal or upgrade – There are specific dates set by the Ontario Fuel Oil Code when underground fuel oil tank systems are required to be removed or upgraded based on the age of the tank, and outlined below:

Schedule for Upgrading Existing Underground Tank Systems:

Deadline to Remove or Upgrade*

Age of Tank

25 years and more, or unknown                 October 1, 2006

20-24   years                                              October 1, 2007

10-19    years                                             October 1, 2008

0-9       years                                              October 1, 2009

* Upgrade includes adding approved leak detection, corrosion protection, spill containment, and overfill protection device.

Requirements for Removal of Underground Fuel Oil Tank Systems

Property owners are responsible for the costs of removing their underground fuel oil tank. The removal must be performed by a TSSA registered fuel oil contractor holding a Petroleum Equipment Mechanic 2 (PM-2) license. The TSSA must be notified once the underground tank has been removed and the property owner must have an environmental assessment report completed by a Professional Engineer, a Professional Geoscientist, a Professional Agrologist, or a Chartered Chemist. If a leak of fuel oil is confirmed, the Spills Action Center of the Ministry of the Environment must be notified of the leak and the property owner is responsible for the cost of the required clean up of contamination.

•A list of TSSA registered fuel oil contractors located in various municipalities can be found at: http://www.tssa.org/regulated/fuels/heating/heatingcontractors/

•To find a PM-2 Contractor in a specific municipality, contact the Ontario Petroleum Contractors’ Association (OPCA) at www.opcaonline.org or Phone: (705) 735-9437 or Toll Free: 1-866-360-6722

•To report a spill contact Spills Action Centre of the Ministry of the Environment at Phone: 416-325-3000 or Toll Free: 1-800-268-6060

Requirements for Upgrading Underground Fuel Oil Tank Systems

Some underground fuel oil tank systems may require an entirely new system in order to conform to the Ontario Fuel Oil Code; others may only need specific upgrades to the corrosion protection, overfill protection, spill containment’s, added leak detection, etc. Underground fuel oil tank systems that are not removed must be upgraded with approved overfill protection, corrosion protection, spill containment and leak detection. Prior to upgrading, an underground steel tank must be subjected to a precision leak test.

Application for Variance for Underground Fuel Oil Tank

The TSSA will consider an application for “Variance for abandonment of an underground fuel tank in place” where removal of an underground tank is not feasible due to certain circumstances, such as a structural consideration. An example of a structural consideration is where an underground tank is situated such that its removal would cause collapse of a retaining wall of a house.

However, the TSSA does not consider an underground tank situated beneath a driveway, back yard, front lawn, or garage, etc. to be a structural consideration. The Variance application process normally takes several weeks because it involves extensive review and research by the TSSA in order to determine whether the tank must be removed or it can remain in place, with conditions. The process begins with completion of the Variance Application (Application for a Variance/Deviation, Form No. 09533) and submission of the application fee and an environmental assessment report to the Environmental Services office of theTSSA. Further information, including the Variance Application form,”Environmental Info Sheet” and fee information can be found at http://www.tssa.org/regulated/fuels/environment/fuelsEnviron04.asp

Above Ground Fuel Oil Tanks

There are no age limit considerations specified in the code or regulation requirements to dictate the replacement of above ground tanks, provided the tank is not leaking.

An existing above ground tank is considered, by the TSSA, as “approved” provided the tank was installed in accordance with the Ontario Fuel Oil Code that was applicable at the time of

Rusted-Oil-Tank---TSSA-Inspection
Oil Tank Will Not Pass Inspection

installation. If an above ground tank is not being used, the tank and all associated piping of fluid content must be emptied and vapour-free; but it does not have to be removed unless the tank is of a capacity greater than 2,500 litres and unused for more than 3 years.

If an above ground fuel oil tank is removed, the TSSA must be notified; an assessment report must be completed setting out the extent of any fuel that has escaped to the surrounding environment; and any contamination must be cleaned up.

Annual Maintenance

All existing above ground and underground fuel oil storage tank systems are required to undergo annual maintenance (unless otherwise specified by manufacturer’s instructions), performed by a TSSA certified oil burner technician (OBT); otherwise fuel oil distributors cannot supply fuel oil. Such services include visually inspecting the tank system for leaks and testing and servicing the oil burning equipment to ensure it is operating properly. It is the property owner’s responsibility to arrange for an inspection.

Leak test – When level 2 or level 1 leak detection is used, a leak test shall be conducted at least monthly.

Comprehensive inspection – All existing fuel oil storage tanks (above ground and underground) and associated appliances (furnace, boiler, water heater, etc.) are required to undergo a comprehensive inspection by a TSSA certified oil burner technician at least once every 10 years, otherwise fuel oil distributors cannot supply fuel oil. Furthermore, a fuel oil distributor is required to prepare a report of each inspection made and retain the report until the next inspection and report are completed. Due to the large number of inspections that were required to be completed by fuel oil distributors, the TSSA approved the following deadlines for comprehensive inspections (from page 2 of the TSSA Update (Fuels Safety Edition) Spring 2006

May 1, 2004 – all fuel oil distributors required all new customers to undergo an immediate comprehensive inspection

May 1, 2006 – certain groups of fuel oil distributors required existing customers to undergo a comprehensive inspection

May 1, 2007 – all systems that previously underwent a basic inspection are required to undergo a follow up comprehensive inspection by May 1, 2007.If “unacceptable conditions” are found and there is an “immediate hazard”, the fuel oil distributor is required to immediately cease supplying fuel oil and to take such steps as are reasonable in the circumstances to shut off the supply of oil to the tank facility, system or appliance. If “unacceptable conditions” are found and they do not pose an “immediate hazard”, the fuel oil distributor may supply fuel oil provided that the owner of the property takes corrective actions, up to 90 days of receiving notice, to conform to the Code (Section 24 of the Fuel Oil Regulation). However, due to the high number of “unacceptable conditions” being found and the resulting backlog in correcting such conditions, the TSSA extended the 90 day time period to 365 days provided that a variance has been granted to extend the deadline – (TSSA Advisory, ref. no. FS-05505, dated November 8, 2005 )

New Smoke Alarm requirements as of 2015

WETT Inspection requirements for Wood Burning Appliances

Why You Need a Home Inspection

Hiring a WETT Certified Inspector

WETT Inspection Barrie is available 7 days a week for your convenience.  Call Roger today  705-795-8255

Wett Certified for Over 15 Years

Articles You May Enjoy

Home Inspectors Barrie Ontario
Midland Home Inspector
Home Inspector Midland
Home Buyers Guide
Orillia

WETT Inspection Information

Innisfil WETT Inspections
Flue Pipe Installation
WETT Certified Inspection – Flue Pipes
WETT Certified Inspections for Barrie, Alliston and Orillia
Barrie WETT Inspections

Inspections

Pre-Delivery Inspections
Pre-Listing Inspection
Pricing Policy
Privacy Policy
Types of Inspections

What Type of Inspection Do I Need?

 What is a home inspection?

Barrie Home Inspections Logo

A home inspection is a limited, non-invasive examination of the condition of a home, often in connection with the sale of that home.

A home inspector has the appropriate training and is ‘certified’ to perform home inspections.  His Home Inspection Knowledge and Experience are the key factors to consider when searching for a home inspector.  The inspectorCertified Barrie Home Inspector prepares and delivers to the client a computerized  report of findings. The client then uses the information presented to make an educated decision about their proposed real estate purchase. The home inspector describes the condition of the home at the time of inspection but does not guarantee future condition, efficiency, or life expectancy of systems or components.

A professional home inspector will look for signs of damage and defects. They’ll often refer buyers to a specialist to investigate further and fully diagnose the problem when and if they spot something significant, or something that Hire a Professional Home Inspector[/caption]lies outside their scope of expertise.

When purchasing a home one of the most critical steps any buyer must take is to get a certified home inspector to perform different types of inspections on the property. These visual examinations not only aid in assessing the condition of the house but its performance as well. Also, it helps you verify whether the owner carried out any maintenance or necessary repairs on the asset. Ironically, many first-time buyers presume that the inspection is simply a formality aimed at identifying the flaws within the house.

Hence, they don’t give the inspection the seriousness it deserves. In a haste to own the home, the buyers skim over the inspection, only to end up incurring endless expenses on property maintenance once they occupy their new residence.

So, just what types of house inspections should you conduct to ensure you get your money’s worth when closing on a home? The following are a few critical ones.

7  Types of Inspections You May Need

General  Home Inspection

The general inspection is perhaps the most common type of assessment known to homeowners. Here, the inspector will focus on features like the plumbing, HVAC system’s efficiency, electrical wiring, structural features as well as roof installations. If the property was being managed professionally there’s a good chance a lot will be intact but if it wasn’t the general inspection will help reveal issues.

The whole aim of the exercise is to identify defects or inconsistencies, which need improving, to bring the property to a desirable state. If the inspector spots an anomaly, he or she might recommend renovations or ask you to go for more specialized inspections.

When conducting a general home inspection, it is prudent to look for an inspector certified by a state-run agency, or one who is a member of reputable national organizations like the National Association of Home Inspectors, or the American Society of Home Inspectors.

Termite or Wood destroying insects

If you live in areas with warm climates then conducting a termite or wood boring insect inspection is a must. The review will help to unearth evidence of structural damage caused by termites, powder post beetles, carpenter ants, and bark beetles. Additionally, the investigation will bring to light any real structural defects likely to be problematic in the future. For example, wood being in direct contact with the soil, which can cause wood decay or dry-rot. While the cost of a termite inspection might vary depending on the property size and the inspector’s fee, it averages between $100 and $ 200.

Chimney Inspection

Crack-in-Cap on Chimney

Besides making the house look architecturally and aesthetically appealing, the chimney adds a sense of warmth, safety, and comfort to your home. It is, therefore, important that you inspect it to ensure it is working efficiently. The inspector will examine it to ascertain whether its joints, liners, flues, interior walls and connectors, have any defects such as cracks, which might inhibit the chimney’s effectiveness in discharging smoke. A chimney inspection costs approximately $ 75, and depending on the review findings; the inspector might recommend chimney restoration or maintenance services.

Foundation, Lot Size, and Boundaries Inspection

It is not surprising for a house to have a faulty and problematic foundation or lot size and boundary issues. Since such a property can cause legal and safety concerns, it is prudent to get an inspection report on these three elements. It will help to determine whether the house has any foundation issues, is sliding, sinking, or in the right location.

Radon Test and Harmful substances Inspections

No matter how attractive the property seems to be, you must obtain Radon Test and Harmful Substances inspection reports. You need to get these tested especially if the home is in New Jersey, Pennsylvania, New York, or areas renown for radon prevalence. Radon, a naturally occurring radioactive gas is carcinogenic. Besides testing for radon, the inspector should probe the property for any presence of methane gas, Asbestos, Formaldehyde, and mold, all of which can lead to serious health issues. In fact, when inspecting the property, bearing in mind how grave the matter is, you must make sure the inspector has the right certification to perform the assessment.

Water Inspections

If the home you are interested in gets its water supply from a well, you need to test the quality of the water, its water table depth, and sanitation level. Some of the things you should also check for include; water portability, hardness, and pathogens like E. coli, Volatile Organic Compounds, and heavy metals like arsenic, cadmium, and lead. Here too, you should only use a state-certified laboratory, preferably those listed on the EPA’s (Environmental Protection Agency) website.

Inspect the plumbing, septic, and sewer system

Even though you might have checked the plumbing during the general inspection you should find out from the plumber whether you need to replace the pipes, more so, if they are the galvanized type. These kinds tend to clog from time to time, meaning you might need to carry out frequenting plumbing maintenance. Similarly, get a sewer inspection to determine whether you home is connected to a sewer system or a septic tank.

Conclusion

When buying a house you should be adamant about getting your independent inspection reports, even if the property owner insists that he or she already has done the inspection. Even though it will cost you more, it might just save you a fortune in property repairs and maintenance costs in the long run.

Articles You May Enjoy

Home Inspectors Barrie Ontario
Midland Home Inspector
Home Inspector Midland
Home Buyers Guide
Orillia

WETT Inspection Information

Innisfil WETT Inspections
Flue Pipe Installation
WETT Certified Inspection – Floor Protection
WETT Certified Inspection – Flue Pipes

Inspections

Pre-Delivery Inspections
Pricing Policy
Privacy Policy
Types of Inspections
Roof Inspection

WETT Inspections Barrie

wett certified inspections

Most problems with Fireplaces and Wood Stoves originate from not being properly inspected.  The masonry chimney is the one item that is prone to damage, from overheating or moisture penetration.  Water damage is the worst culprit when it comes to chimney damage.  Your chimney is constantly exposed to rain, snow and the ongoing freezing and thawing cycles.  Water will enter the smallest crack, and it becomes like a “little jackhammer” constantly freezing and expanding the crack.  Although a slow process, the water will continue downwards destroying everything in its path.

Barrie has many older homes that were built with old style fireplaces.  Many of these fireplaces are not safe to use and should be thoroughly cleaned and inspected prior to using.  A chimney that has not been used or inspected for a long period of time could have many serious defects that could cause a fire.  Water may have cracked your flue tile, birds may have nested in your chimney, the list is endless.

Older style chimney caps are no longer permitted.  They now have to be one piece caps with a “drip edge” installed. As you can see in the picture, the mortar is deteriorating and cracking.  Water will soon start making its way through the brick and brick mortar.  Older home owners are not very likely to climb their roof to check their chimney.  This is where a WETT Inspection is invaluable for the protection and safety of the home.

Water penetration can cause interior and exterior damage to your home and masonry chimney including:
  • Rusted damper assemblies
  • Deteriorated metal or masonry firebox assemblies
  • Rusted fireplace accessories and glass doors
  • Rotting adjacent wood and ruined wall coverings
  • Water stained walls and ceiling
  • Clogged clean out area
  • Deteriorated central heating system
  • Stained chimney exterior
  • Decayed exterior mortar
  • Cracked or deteriorated flue lining system
  • Collapsed hearth support
  • Tilted or collapsed chimney structure
  • Chimney settlement

An ounce of prevention is definitely worth a pound of cure when it comes to your masonry chimney.  If you can see cracks at the side of your chimney cap then you know there will be cracks on the top.

Ember Protection

Ember protection is another requirement that has evolved over time.  A wood stove is required to have 18 inches of ember protection in front of the opening door.  Stoves that only require ember protection can be placed directly on floors of non-combustible construction, such as tile or brick.  Sheet metal and any other non-combustible product that has no gaps etc.   Custom Hearthpads are available for purchase and are ULC rated.

Most modern stoves do not require “heat protection” for the floor.  The stove legs are typically long enough to not require any protection.  It would be wise to double check for this when buying a wood stove.  The cost of installing a proper heat pad can be expensive.

Fireplace Hearth Extension

Fireplaces with less that 6 square feet ( 0.56 M2 ) of opening require a hearth that extends 16 inches to the front and 8 inches to the sides.

Fireplaces with over 6 square feet of opening require a hearth that extends 20 inches to the front and 12 inches to the sides.

A clear area in front of fireplaces of 48 inches is usually required to provide room for fueling and ash removal.

Inspect Your Wood Appliance Every Year Prior to Using

Exterior

  • Look for loose or damaged bricks on chimney exterior
  • Make sure flashing (metal barrier at roof line) is intact and in-place
  • Check for cracks or leak lines on chimney crown
  • Clear chimney cap and grate (wire mesh) of debris; ensure tight fit
  • Clear path down flue through smoke chamber
  • Look for stains or leaks down flue
  • Make note of visible creosote buildup

Interior

  • Check for damage to floor and wall protection
  • Note rust damage
  • Look for smoke or leak stains
  • Check gaskets and gasket rope on doors; ensure tight fit
  • Inspect door and window seals
  • Check that glass window is crack-free; clean soot
  • Dump ash drawer; replace empty
  • Check fireplace screen for holes
  • Make sure damper (interior door into chimney throat) is clear of debris
  • Open damper for good oxygen flow
  • Clean dust off woodstove blower; ensure operable
  • Replace filters
  • Replace batteries in carbon dioxide and smoke detectors
  • Make sure fire extinguishers are current and easy to access

Hiring a WETT Certified Inspector

WETT Inspection Barrie is available 7 days a week for your convenience.  Call Roger today  705-795-8255

Wett Certified for Over 15 Years

Articles You May Enjoy

Home Inspectors Barrie Ontario
Midland Home Inspector
Home Inspector Midland
Home Buyers Guide
Orillia

WETT Inspection Information

Innisfil WETT Inspections
Flue Pipe Installation
WETT Certified Inspection – Flue Pipes
WETT Certified Inspections for Barrie, Alliston and Orillia
Barrie WETT Inspections

Inspections

Pre-Delivery Inspections
Pre-Listing Inspection
Pricing Policy
Privacy Policy
Types of Inspections

[/et_pb_text][/et_pb_column][/et_pb_row][/et_pb_section]

Asphalt Shingles

Asphalt Shingle Information

Asphalt shingles have been largely replaced by Fiberglass Shingles which are the most common shingle material now  used. The shingles consist of fiberglass base coated  and covered with granular material. In 1960 fiberglass mat bases were introduced with limited success, the lighter more flexible shingles proved to be more susceptible to wind damage particularly at freezing temperatures. Also in the 1960’s research into hail damage which was found to occur when hail reach a size larger than 1.5 inches..

Asphalt shingles were historically classified by weight. The most common type of shingles used today weigh two hundred and ten pounds per square. They have an average life expectancy of twelve to fifteen years. Heavier asphaltFailing Fiberglass Shingles shingles such as 225’s (two hundred and twenty-five pounds per square) 235’s and even 320’s are available. 225’s and 235’s have an average life expectancy of fifteen to twenty years, while 320’s have a life expectancy in excess of twenty-five years.  ( in my experience as a Home Inspector I found asphalt shingles typically lasted around 20 years but the newer fiberglass type of shingles will only last around 15 years )

Today, asphalt shingles are classified by the warranty offered by the manufacturer. They would now be known as 10 year, 15 year, 20 year, 25 year, 30 year or 35 year shingles. The reason for this change was the use of lighter fiber glass matting. Modern shingles are also available in various textures and edge patterns.  In my personal experience shingles never last as long as the manufacture claims.  Seniors have often told me that their roof is guaranteed for 35 or 40 years,  not that they would be around to make a claim.

Since the mid 1960’s, most asphalt shingles have been of the self sealing type. A strip of tar is put on the surface of the shingles by the manufacturer. This strip is covered by the shingle installed immediately above. When the sun warms the roof surface, the two shingles stick together. This helps prevent the shingles from being blown off in a wind storm. (Shingles installed in the late fall and winter often do not seal themselves until the next spring.) On older, non-sealing asphalt shingles, a wind storm is can be the end of the shingles usefulness. The shingles, brittle with age, simply tear off and blow away.

Conventional asphalt shingles can be used on a slope as low as four in twelve, using normal techniques. Some roofers use these shingles down to a pitch of two in twelve if the roof is first covered with non-perforated, saturated felt papers. The felt papers must be overlapped by fifty percent and the section at the eaves (from the bottom edge up to twenty-four inches beyond the interior of the exterior wall) must be cemented in place to provide extra protection. Unfortunately, it is impossible to determine, during a visual examination, whether this procedure was undertaken. Most roofers prefer to use rolled asphalt roofing in this type of situation.

There are also special low slope shingles which are designed for pitches down to two in twelve. With these shingles, only one third of the shingle is exposed to the weather (as opposed to half of the shingle on a conventional installation) and the shingles are individually cemented in place.

Regardless of the type of asphalt shingle used, there are two general rules if thumb you should be aware of.  1) Sunlight is number one cause of failure of asphalt roofs and consequently in most areas the south and west exposures wear out the fastest.  2) The steeper the pitch of the roof, the longer the shingles will last.

As asphalt shingles wear, they lose their granular covering. The granular material protects the shingles from ultra-violet light. As it is worn off, the shingles dry out and become brittle. They crack, buckle, and curl. Areas where the granular material has eroded the fastest, wear out first. These may be areas where there is heavy foot traffic, abrasion from tree branches, or erosion from downspouts discharging onto the roof surface.

Occasionally, shingles will wear out prematurely due to a manufacturer’s defect. Blisters, approximately the size of a dime, form underneath the granular surface and cause raised sections in the shingles. While these are not aesthetically pleasing, they do not affect performance until the granular material wears off in these areas.  IKO had manufactured an organic shingle which created a Class Action lawsuit due to early shingle failure.

The Barrie Home Inspector also provides Roof inspections for Commercial Buildings

Articles You May Enjoy

Home Inspectors Barrie Ontario
Midland Home Inspector
Home Inspector Midland
Home Buyers Guide
Orillia

WETT Inspection Information

Innisfil WETT Inspections
Flue Pipe Installation
WETT Certified Inspection – Floor Protection
WETT Certified Inspection – Flue Pipes
What Type of Home Inspection Do I Need

Electrical Service Boxes

Electrical Service Boxes

The service box includes a circuit breaker which can be used to shut off all the power in the house, or a switch with a handle located on the outside, and the service fuses inside. The cover on the service box is often sealed by the utility.  Air conditioners are required to have a Service Shut Off on exterior of house.

The service box may stand alone, although in modern homes, the service breaker is often incorporated into the service panel. In either case, it is important that the rating on the box itself, is at least as large as the service entrance cables and fuses or breakers inside. For example, if a house has service entrance wire and fuses rated for 100-amps, a box rated for only 60-amps is not acceptable. More than 60- amps flowing through this box may lead to overheating.

Every home should have a disconnect means so the system can be shut off. Working on a live electrical system is very dangerous. In the U.S. (and in some Canadian situations) it is permitted on existing installations to have up to six switches to disconnect all the house power.

Electrical Codes

Wiring safety codes are intended to protect people and property from electrical shock and fire hazards. Regulations may be established by city, county, provincial/state or national legislation, usually by adopting a model code (with or without local amendments) produced by a technical standards-setting organisation, or by a national standard electrical code.

Disconnect missing from service box 


Electrical Service Box

The First Electrical codes were created in the 1880’s with the commercial introduction of electrical power. Many conflicting standards existed for the selection of wire sizes and other design rules for electrical installations.

The first electrical codes in the United States originated in New York in 1881 to regulate installations of electric lighting. Since 1897 the US National Fire Protection Association, a private non-profit association formed by insurance companies, has published the National Electrical Code (NEC). States, counties or cities often include the NEC in their local building codes by reference along with local differences. The NEC is modified every three years. It is a consensus code considering suggestions from interested parties. The proposals are studied by committees of engineers, tradesmen, manufacturer representatives, fire fighters and other invitees.  Many of the NFPA codes have been adopted worldwide as the Standard for various types of equipment and installations.  Sprinkers, Fire Hydrants, Fire Extinguishers, Airport Safety Reguations and Commercial Cooking Equipment to name just a few.  In Canada the authority to use the NFPA publications typically comes from Canadian Standards such as the National Building Code of Fire Code.

Since 1927, the Canadian Standards Association (CSA) has produced the Canadian Safety Standard for Electrical Installations, which is the basis for provincial electrical codes. The CSA also produces the Canadian Electrical Code, the 2006 edition of which references IEC 60364 (Electrical Installations for Buildings) and states that the code addresses the fundamental principles of electrical protection in Section 131. The Canadian code reprints Chapter 13 of IEC 60364, but there are no numerical criteria listed in that chapter to assess the adequacy of any electrical installation.

Although the US and Canadian national standards deal with the same physical phenomena and broadly similar objectives, they differ occasionally in technical detail. As part of the North American Free Trade Agreement(NAFTA) program, US and Canadian standards are slowly converging toward each other, in a process known as harmonization.

To enable wires to be easily and safely identified, all common wiring safety codes mandate a colour scheme for the insulation on power conductors. In a typical electrical code, some colour-coding is mandatory, while some may be optional.

Service Boxes and Panels

In a conventional 60-amp service with circuit breakers, the breakers will trip when the current in either leg reaches 60-amps. Where fuses are used in the main service box, each fuse works independently. If more than 60-amps flows through one fuse it will blow. This leaves roughly half the house without power, including part of the electric stove, for example. If more than 60-amps flows through the other fuse, it too will blow, leaving the entire house without power.

Federal Pioneer & Federal Pacific Electrical Panels

Federal Pioneer Stab Lok Breakers

Federal Pioneer Panel Problems – The Electrical Safety Authority has revised and re-issued a Safety Flash that was originally published in 1997 – their concern is that potential problems might still exist for Federal Pioneer breakers that may not trip! Schneider Canada has announced a voluntary Replacement Program on certain NC015 and NC015CP Breakers. The affected circuit breakers are Federal Pioneer NC015 and NC015CP, Single Pole Rated 15A, Stab-Lok Circuit Breakers – Manufactured between August 1, 1996 and June 11, 1997. These circuit breakers can be identified by a Square / rectangular shaped BLUE colored handle Replacement breakers are identified by a hole drilled in the handle (Blue color) OR Replacement breakers manufactured after January 1, 1999 are identified with a rounded and ribbed handle (Blue color) Check for a square / rectangular handle with a hole, as illustrated or a rounded / ribbed handle – these are OK and not impacted by the recall notice. Breakers with black handles are also OK to use and not impacted by the recall notice. Contractors/Electricians: For any suspect blue-handled circuit breaker replace the breaker and return it to Schneider Electric for full credit, or contact Schneider Electric Customer Care Centre at 1-800-565-6699 or the Schneider Electric Recovery Administration team, at 1-866-333-1490 for additional information. Customers should call their contractor or call Schneider.

Read More

Residential Service Risks
DIY Electrical Problems in Home 
Self Test GFCI Receptacles
Aluminum Wiring in your Home

Hiring a WETT Certified Inspector

WETT Inspection Barrie is available 7 days a week for your convenience.  Call Roger today  705-795-8255

Wett Certified for Over 20Years

Articles You May Enjoy

Home Inspectors Barrie Ontario
Midland Home Inspector
Home Inspector Midland
Home Buyers Guide
Orillia

WETT Inspection Information

Innisfil WETT Inspections
Flue Pipe Installation
WETT Certified Inspection – Flue Pipes
WETT Certified Inspections for Barrie, Alliston and Orillia
Barrie WETT Inspections

Inspections

Pre-Delivery Inspections
Pre-Listing Inspection
Pricing Policy
Privacy Policy
Types of Inspections