
Window Crank Repair – Step by Step
Window Crank Repair – Fix those annoying windows that yo have to removed the screen to manually close a casement window due to broken or stripped crank mechanism.
Sticking or hard to close windows are easy to repair, just read article and follow simple guidelines and steps.
Steps:
Window Crank Repair – Removing the Crank
Start by identifying the brand of window so you can match the mechanism. Look for a series of numbers and letters on the metal channel between the glass panes. Most home centers and lumberyards can determine the manufacturer from these numbers. If you have single – pane casement windows or you can’t figure out the brand, take the damaged crank to the store. You still can close and lock the window by hand, even when the crank is removed. Replacement cranks cost between $8 and $15 US.
Remove the bottom piece of wood stop that goes over the crank mechanism with a small pry bar or a stiff putty knife. You should not have to remove the side stops. Protect the window sill and trim with a small piece of wood such as a shim. Most window frames are made of pine, which is soft and easily crushed or dented if you don’t protect it. You may need to break the finish seal between the stop and the frame with a utility knife before you pry.
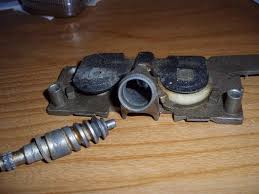
Open the window far enough to expose the screws that secure the crank to the sill. Remove the screws and then slide the mechanism along the metal track on the bottom of the sash until you reach the small keyhole slot in the track. Slip the nylon roller out at the slot. The crank arm, cover plate, gearbox and handle will come off in one piece.
Window Crank Repair – Step by Step Guide
Use the appropriate steps and information above to remove your style of mechanism.
1. Open the window and, working from outside if necessary, disengage the arm from the track. In some models you must remove the screws that attach the arm to the sash.
2. From inside, remove the mounting screws that secure the hardware to the window.
3. If there are no visible screws, remove the handle by loosening the setscrew that holds it onto the shaft and lift off the snap-on plastic cover to access the screws.
4. If there is no such cover, use a trim pry bar to remove the trim that extends from side to side and is notched around the gearbox (see Tips). There may or may not be nails.
5. Clean the gearbox with a soft wire brush and a solvent such as kerosene.
6. Operate the mechanism to make sure the gears mesh properly and aren’t worn. If a replacement is required, contact the window manufacturer. Most windows do not have the manufacturer’s name printed on the hardware or window, but if you look carefully at the metal spacer between the panes of an insulated unit, you’ll probably find the name there. Or bring the old part to a window or lumber dealer who can identify and order it for you.
7. Working from outside, clean the track on the sash’s underside with the same brush and solvent to remove dirt-caked grease.
8. Lubricate the window operator with a little light household oil and reinstall it, reversing the removal procedure in steps 1 through 4. Do the same if you are installing a replacement part.
9. Lubricate the track on the sash’s underside with white grease.
10. Reattach the arm to the sash and operate the window crank.
11. Wipe any excess grease off the track with paper towels.
Window Crank Repair – Overall Tips:
To remove wood trim, first break any paint sealing the joints using the tip of a utility knife. This will make the piece easier to remove without damage. Work very carefully to avoid cutting into the wood or injuring yourself. If you don’t want to reinstall the old part until a new one comes in, just push the window closed from outside, and have someone engage the sash lock from inside.
Before Installing New Mechanism – Repair the Sash if Required
If you don’t correct problems with the sash, you’ll strip the gears on the new crank in a very short time. Lightly sand the entire edge of the sash where it meets the window frame with a medium – (150 – ) grit sandpaper. You don’t need to sand too much, but enough to keep the sash from binding. Be careful not to damage the weather strip on the sash. It’s important to maintain a straight edge when sanding, so use a sanding block.
If your windows are clad with either vinyl or aluminum, don’t sand the cladding. Aluminum cladding will scratch, and you won’t be able to paint the vinyl if you gouge it. Paint buildup may also cause a sash to stick. Too often the sash is painted when it is shut, or it is painted while open and the window is closed before the paint is dry. The next time you open the sash you rip the paint, leaving a rough edge or paint blobs. Knock down the paint blobs with a stiff – bladed putty knife. Then sand the edge with a medium – grit sandpaper.
Paint the edge of the sash to seal out moisture. Prime bare wood before painting. For stained and varnished windows, seal any sanded spots with varnish or polyurethane. If you don’t seal the sanded spots, the sash will continue to absorb moisture and swell.
Installing New Crank
The new mechanism should fit into the footprint of the old one. Open the new crank to expose the screw holes. Slip the nylon roller into the track before you install and secure the new crank, or secure the new crank and then move the sash by hand to align the nylon roller and keyhole slot. Secure the handle with the set screw and close the window.
Check the orientation of the handle when the window is closed. You want it pointing down toward the floor so it doesn’t interfere with drapes or blinds. Loosen the set screw and adjust the handle orientation as needed.
Finally, reinstall the wood stop. Carefully pull the nails out through the back of the stop and re-secure it with brads or finish nails.
When picking up your new crank mechanism, ask the supplier for installation instructions, if not included, and follow those instructions for installation.
Newer homes that have bedrooms in the basement are required to have an Exit Window on that floor. Read requirements for Basement Window Exits