Ground Fault Circuit Interrupter Protection on Receptacles
Required Receptacles in Residential Washrooms
Rule 26-710(f)
Rule 26-710(f) states that at least one receptacle shall be installed within 1 m of the washbasin located in each bathroom or washroom.
GFCI Protection of Kitchen Counter Receptacles
Rule 26-700(12)
The 2002 edition of the Ontario Electrical Safety Code includes an Ontario amendment to Rule 26-700, which requires Ground Fault Circuit Interrupter (GFCI) protection for Kitchen Counter receptacles effective January 1, 2003. The new Subrule (26-700(12) states that effective January 2003:
(12) Receptacles located in kitchens and installed within 1 m of a kitchen sink along the wall behind counter work surfaces shall be protected by a ground fault circuit interrupter of the Class A type.
Appendix B note: Distance of 1 m is measured from edge of kitchen sink.
The following guidelines shall be used for consistent interpretation and application of this new subrule effective January 1, 2003.
1. This rule applies to all receptacle installations located within 1 m of a kitchen sink along the wall behind counter work surfaces where the plans or application for inspection is received on or after January 1, 2003.
Home Inspections and Ontario Building Codes. The Ontario Building Codes are a minimum set of standards that all building must meet when constructed. Although the Ontario Building Code is not designed to be used as a requirement to bring existing buildings up to this standard, not having a knowledge of the code would not allow a person to know what deficiencies existed in a building.
Existing buildings only have to be built to the standard of the existing building code that was in effect at the time of construction. This is known as “Grandfathering” and will apply to most buildings unless they have under gone a “Major Renovation, Change of Use or Occupancy or a Building Permit has been issued that would involve bringing building up to current requirements. Most older buildings would fall under Part 10 or 11 of the Ontario Building Code and not require extensive upgrading, especially if the building was over 5 years old.
Knowledge of the Ontario Building Code is essential when performing Home Inspections. Some home inspectors mask their lack of skills and training by refraining from ever mentioning the Ontario Building Code and this lack of knowledge can lead to missed deficiencies that a trained inspector would pick up. If your house was built to the minimum standards set out by the Building Codes, how could any professional not be trained in their use and application. As a member of the Ontario Building Officials Association I ensure that my knowledge is maintained at the current editions of the Building Code, to do other wise would be unfair to my customers.
Inspecting Century Homes by the Barrie Home Inspector
Century homes are a marvel in construction. People are attracted to these beautiful old buildings and they usually do not remain on the market long. Most buyers want the assurance of a qualified home inspector before buying, what could be in some cases, a potential “Money Pit”. Usually just the age of the building is a testimony to the quality of construction, but there are some items that need to be verified prior to committing your hard earned dollars.
Here are some areas of the inspection that might be of interest to potential buyers. These are just a brief overview and by no means an indication of what a complete inspection entails.
Foundation
The grade of the foundation is extremely important to the condition of framing members and perimeter framing etc.Having a foundation wall that is too low to grade level is just inviting moisture and water to attack your structural framing members and subsequent rotting.
Water penetration of foundations is another cause of deterioration which can be repaired but only after removing water source.This can be caused by improper grading, eave troughs discharging at foundation or sump pumps discharging beside foundation walls.
Dianne Nice
Globe and Mail UpdatePublished on Monday, Sep. 20, 2010 12:00AM EDTLast updated on Monday, Sep. 20, 2010 6:58AM EDT
Even though it’s still warm outside, Roger Frost is thinking about winter.
Time and again, the Barrie, Ont.-based home inspector has seen homeowners rack up huge expenses because they forgot to take a few preventive steps in the fall.
The most common mistake, he says, is forgetting to seal window sills. A $5 tube of caulking is all it takes to fill in cracks and prevent moisture from damaging mortar and bricks. “It’s probably the most expensive damage to most houses, other than just letting the roof go,” Mr. Frost says. “If you don’t notice it right away, it can only take one winter and then you’ve got damaged brick to replace.”
For those closing their cottages for the season, now’s the time to seal any openings that could attract animals and trim back tree branches near the roof. Cottage owners should hire a local to remove snow from the roof to avoid a collapse, Mr. Frost says, and don’t forget to drain water from pipes and pumps before leaving for the winter.
Here is Mr. Frost’s list of fall maintenance essentials:
1. Check windows and doors. Windows should be caulked outside. Inside, make sure there is proper insulation between the window and the rough framing. Check window sills and frames for cracks where water can enter. If wood sills need repainting, get it done. Exterior doors can have weather stripping and an adjustable door sweep installed to reduce unwanted air flow and heat loss.
2. Winterize and store equipment. Drain the gas from your lawnmower. Wash and store patio furniture and gardening equipment in a dry area to prevent rust and mildew. Rather than covering your air conditioner, place some spacers on top with a weighted piece of plywood to keep snow off, but allow lots of ventilation to prevent corrosion.
3. Service your furnace. Run your furnace before it gets cold outside to avoid expensive emergency service. Annual maintenance by a technician is recommended and filters should be replaced monthly – or sooner if you have a lot of pets. If your home is still using a hot-water system, you should bleed the system by opening the valves at the radiator until water seeps out.
4. Seal your home’s exterior. Fill any gaps and cracks around windows, door frames, the foundation and pipes entering the home to keep water and animals out. Sealing your asphalt driveway, patio and wood deck can prevent them from cracking and sagging.
5. Inspect the roof. Check flashing and shingles for potential water entry points. To prevent ice build up, clean all gutters and downspouts of debris. Also, make sure your attic insulation is sufficient at the edges of the roof and that you have soffit baffles installed to allow ventilation.
6. Prevent components from freezing. Outside water supply taps and lines should be shut off from inside the home; the taps and lines should be drained of all water and left open. Insulating plumbing pipes will not only prevent any chance of freezing but it will also prevent condensation.
7. Inspect your fireplace. Clean debris from the rain cap on your chimney and check it for gaps and cracks, along with the bricks and mortar. Annual chimney cleaning is recommended and fall is the ideal time. Make sure the damper works properly. Store wood in a dry place away from the outside walls.
Check list Home Inspections have almost become a thing of the past, but unfortunately some buyers are being duped into using these antiquated reports just to close the deal.
Read below and give some thought to what your home inspector is doing for you 🙂
By Carlito Pablo, September 15, 2010
Ed Witzke noted a lot of crappy stuff about the house on Rutledge Street in Victoria in his inspection. But what he observed about the washroom was particularly striking.
“A big fat fellow like myself only gets 1/2 bum on toilet seat,” the Vancouver-based home inspector wrote in his report to his client.
To illustrate his point that it was difficult to sit on the main-floor toilet because it was too close to a wall, Witzke even drew an image of an individual on the throne. A large portion of the person’s bottom was hanging off the seat.
As well, Witzke reported to Rajan Reddy, the prospective Victoria home buyer who hired him, that the “acoustics in [the] bathroom is very poor—you can hear all body noises.”
The purchase didn’t go through, and Reddy’s realtor, Gord Hoshal, felt that Witzke was full of crap.
On July 7 of this year, Hoshal filed a complaint against Witzke—a UBC-trained architect with more than four decades of experience as a home inspector—with the Applied Science Technologists and Technicians of B.C., accusing him of being unprofessional.
But Reddy is pleased with the service rendered by Witzke.
“He showed me all that crap and, basically, I feel that if Ed [Witzke] okayed the house, the sale would have gone through and I would have ended up with a piece of crap,” Reddy told the Georgia Straight in a phone interview from Victoria.
In his report to Reddy, Witzke stated that the property is “all bulldozer ready”.
Reddy says he’ll hire Witzke the next time he looks at a property.
“It had a suite downstairs, and there was a beam missing,” he said of the house he hired Witzke to inspect. “It looked like there was some water damage downstairs. The plumbing was in bad shape.”
Reddy said that Hoshal has been his realtor for some time. “He sold me my first house 10 years ago,” the Victoria resident noted.
Hoshal declined to talk about his complaint when reached by the Straight.
But in his complaint addressed to ASTTBC registrar John Shortreid, Hoshal said about Witzke: “After going on his website I found many things stated that lead me to believe he is somewhat jaded for whatever reason towards my profession and indeed a troubled soul, but that is no excuse for his lack of professionalism.”
Hoshal has it right about Witzke’s feelings toward realtors.
According to Witzke, many realtors want to control the home-inspection process so that sales go through swiftly and they can get their commissions. He claimed that realtors usually recommend to buyers inspectors they’ve had “luck” with in previous transactions.
“The more thorough the report is, the more they may have to reveal to the next prospective party buying the place, or the more they now have to work because they have to go back to the other realtor and back to the owner and say, ‘Look, these things were discovered,’?” Witzke told the Straight in a phone interview.
He noted that many realtors prefer a “checklist inspector”—one who doesn’t look closely at a property except to make sure that it has a roof, doors, and windows.
“For, I don’t know, $350 or whatever, the client gets a three-ring binder, a nice glossy three-ring binder saying that everything is okay, and once they move in, then I get the phone calls saying, ‘Guess what? This whole inspection process seems to be a fraud,’?” Witzke said.
In response to Hoshal’s complaint, Witzke wrote Shortreid on August 13. He noted that the case isn’t about a client who wasn’t happy with his services. According to the home inspector, it’s about “a realtor who lost a sale”.
As ASTTBC registrar, Shortreid acts as the prosecutor of complaints filed with the regulatory body.
In a phone interview with the Straight, Shortreid explained that a practice review panel makes recommendations to a member who’s facing a complaint. He said that if those recommendations are accepted by the member, the matter is deemed closed and is not subject to a disciplinary hearing.
Shortreid wasn’t able to say when the complaint against Witzke will be resolved.
Witzke has been through this before. According to him, Hoshal’s complaint is the fourth filed by a realtor against him. He said that except for one that has been resolved in his favour, the complaints are still pending decision.
Many “how-to” magazines run articles touting miracle products that stop water from permeating through foundations or basement walls and floors. While some products may be effective at mitigating water migration through cracks or flaws in a wall, blocking groundwater can be as tough as keeping water from leaking through split seams of a wooden boat. So long as any part of the boat is in the water, a certain amount of water is bound to find its way inside.
Never wait until water enters the basement or permeates the foundation before treating the root cause. The resulting dampness is both distasteful and potentially dangerous, even if there is no noticeable standing water. There are four ways that moisture can permeate foundations or enter and collect in basements:
High groundwater table
Surface (rain) water leaking through openings or flaws in the walls
Condensation
Broken plumbing and/or irrigation runoff
Wet basements are a very common problem, particularly in low-lying areas or mountains where high water tables are common. This means that the ground water level has risen up to its high point for the year due to melting snow, spring rains, lack of water pickup by the trees and plants, and the absence of sun to dry the ground during the winter.
Some soils such as clay bind water tightly, keeping the water table high for extended periods. Porous soils including sands and gravels pass water quickly, yet often have high springtime water tables, especially in low areas due to excess springtime runoff. Unfortunately, many homes are built with inadequate protection from groundwater, even though site conditions may be well suited for the proper installation of a simple and cost-effective drainage system.
Once a water problem is discovered after a house is built, it is very difficult and expensive to remedy. If left unchecked, structural and health-related problems may persist. Excessive moisture not only results in a musty smell or damage to carpet and wood flooring materials, but it promotes growth of mold spores, which can result in asthmatic symptoms in many people. For this reason, the use of vapor barriers under slabs as well as other drainage techniques are essential to keeping your home dry year-round.
To help illustrate the high groundwater problem, imagine a 12″-high pile of sand in the middle of your bathtub — with six inches of water in the tub around it. If you were to dig a six-inch-deep hole in the sand, you would find water at the bottom of the hole. By adding more water to the tub, the water level in the hole would rise as the surrounding water reached equilibrium due to hydrostatic pressure. This simulates the effect of a higher water table acting on a foundation. Now, inserting a watertight box into the hole would cause it to float. If there were holes in the box, water would seep inside. In this analogy, the box is the basement or foundation, and the tub water is groundwater.
Wrong Culprit Years ago I did a job for a homeowner who insisted that her basement became wet only after a rainstorm. After lots of digging and waterproofing, (and continued water in the basement) I was left with a serious question about the real source of the water. Finally I started checking the house plumbing and discovered a leak in the water heater! I’ve learned to more be suspicious.
Keeping Water Out
Ironically, making residential basements absolutely watertight can lead to other problems if not properly engineered. For example, basements of many commercial buildings in highly developed areas are built watertight. However, their construction costs are extremely high compared to typical residential basements because their foundations and floor systems are built to far more stringent specifications. This is not only to keep water out, but to keep the high pressure of outside water from causing structural damage. Consider this real-life situation that occurred a few years ago: During one extremely rainy night, a family awakened to a strange sound coming from their basement. Apparently, excess rainwater had saturated the ground around their home given its location in the lowest section of their development. The extreme pressure from the accumulated ground water actually buckled up the basement floor, causing the soil from under the floor to erupt six feet, covering their washer and dryer. The sudden soil displacement undermined the overall foundation, causing one of the walls to fall over a foot. The house was abandoned for massive structural repairs. Although this is an extreme example, it demonstrates the powerfully destructive force of water. This foundation was built in a manner similar to many residential basements. Yet, by allowing the groundwater pressure to rise without relief, failure resulted in the weakest part of the structure which, in this case, happened to be the concrete floor. Ironically, if homes were absolutely watertight, they might even float like the box in the bathtub, resulting in an unstable structure. However, many homes have sump pumps to discharge out any water that might leak in which could otherwise damage the basement. Fortunately, as water is pumped out of the basement, the water table around the house is lowered, (like pulling the plug on the bathtub drain) relieving the “hydrostatic” pressure. This is why floating houses or erupting floors are rare.
One effective way to check the water table near a house which has a dug well is to uncover the well and measure the depth from the ground surface down to the water. Compare this depth to that of the basement floor below grade and the difference equals the depth to which the basement would flood if the water were not removed. Even if the house is located on sloping terrain, the water table remains approximately the same distance down from place to place as groundwater tends to follow the contour of the surface.
Perimeter Drains
In many situations, particularly in mountainous regions where the land is seldom flat, it is possible to drain water away from most foundations and basements by gravity rather than by pumping. The traditional method specifies a perimeter drain around the outside of a building during its construction. The drain outlet slopes downhill away from the house until it reaches the surface of the ground where it can freely discharge by gravity flow. The advantage of this method over pumping water out of a sump is that it lowers the water table around the house, preventing water from ever reaching the cellar in the first place.
In many instances where experts have been asked to troubleshoot wet basement problems, a common finding is drain pipes that were installed above the foundation footing, which allows water to rise to the level of the floor (Figure A, level Y). If the builder made the additional mistake of installing the drain pipe with the weep holes facing up, then the level of water has to rise to the top of the pipe (level X) before the pipe can pick up any water. Other times there is little or no porous bedding material and pipe inlet holes can become plugged. Another problem occurs with large bedding stone. Migration of the original soil into the bedding plugs up the stone, leading to failure. Often a combination of problems may coexist. Most contractors use 1 1/2″ crushed stone around the outside of PVC or thinwall perforated septic system pipe which has 1/2″ or 5/8″ holes every few inches. Usually this is entirely satisfactory, though in some cases capillary action (wicking) within the soil can make the basement floor damp even though it is a few inches above the artificially lowered water table.
Due to the severe conditions encountered when building a home several years ago, the following example illustrates an improved method. Just as sitework started, the property was deluged with rain. The rain aggravated an already difficult groundwater situation, threatening postponement of construction. However, with patience (and a good pair of rubber boots), perimeter drains were installed four feet outside of where the house was to be located. Within days of installing the drains, excavation for the basement was able to proceed as if it were a dry summer. The home is built into the ground about six feet deep on a gently sloping hill. Several years have since passed and the home has never been bothered by moisture in the basement. This is in spite of the original springtime water table just two feet below the surface of the ground. This same procedure is excellent for drying out existing wet basements where conditions permit.
Ensuring Effective Drainage
The first consideration is setting the drain pipe deep enough to lower the water table well below the floor in order to reduce the effects of capillary action (wicking). Another way to reduce this effect — generally limited to new construction — is to install a layer of crushed stone entirely under the basement floor. Water cannot “wick” through this coarse aggregate. Although this is more costly, it is good insurance for a dry basement. Alternatively, installing the drain pipe a little lower may be a very cost-effective alternative, assuming there is sufficient side hill grade to ensure gravity discharge well away from the structure.
For new construction and retrofit situations, place the drain pipe a foot or more lower than the footing whenever possible and far enough away to avoid undermining the foundation. Generally 2′ to 4′ or even more is necessary to protect landscaping or porches and similar structures. In retrofit situations, installing a drain on the upgrade side of the house can yield a significant improvement, as it is usually only necessary to intercept water moving through the ground toward the house to eliminate the moisture problem. This type of drain is considered a “curtain drain” rather than a footing or perimeter drain, especially if it is several feet from the house. Its job is to lower the water table downgrade in order to protect the house. The curtain drain method is an important consideration particularly for retrofit installations as it can reduce site disruption and the resulting cost of excavation.
Properly installed perimeter drains create an “island” out of the house site by lowering the water table completely around the house. They keep water from entering under the footings and, in my experience, provide the surest protection against any type of dampness in a basement resulting from groundwater. There are some situations where perimeter drains are not necessary, however. A thorough knowledge of the site, or an exceptionally low water table indication from a septic system test pit, can provide such a determination. If you happen to be one of those folks already blessed with an unwanted indoor swimming pool each Spring, whether in a new or existing house, rest assured that there usually is something that can be done. However, since soil conditions vary so greatly, it is wise to consider your circumstances carefully before deciding on a course of action.
Leaks in Foundation Walls
Another condition that can sometimes appear to be high ground water leaking in may simply be surface water entering over or through the foundation at bulkheads or window openings, seams between walls, and/or, flaws in the foundation. Poor surface grading can direct water toward the lip of a bulkhead or towards basement windows where it can spill over into the basement. By not paying attention during heavy rains, a homeowner can sometimes end up blaming the wrong culprit.
Surface water leakage
Surface water leakage is reasonably easy to locate once you get on track. The solution often involves regrading to drain water away from the foundation. In the case of foundation windows, however, it is not always possible to shed water away since the bottom of the windows are often too far below the adjacent ground, requiring the installation of window wells. These often consist of corrugated galvanized steel half circles but can also be made of pressure treated wood or masonry. The goal is to make the top of the window well high enough to be able to slope the surrounding ground surface away from the house. A problem arises when the window well is directly below the roof drip, especially in cold, wet climates where rain gutters are seldom used (because snow and ice fills them, making them useless, or ripping them from the building!) The solution is either to cover the window well with a clear plastic dome which also keeps out leaves and critters or to create a mini-drywell under the window well to allow rainwater to soak away into the ground before it can rise up and find its way through the window. This leads to another issue: porosity or flaws in the wall itself. If a foundation wall is totally watertight there is little problem with letting water run down against it all the way to the perimeter drain. If the wall has had adequate damp-proofing and/or the water drains quickly through the soil, there is little to be concerned about. The problem is that many foundations are have defects and hairline cracks which allow water infiltration.
Sources of Leaks in Foundation Walls
Concrete block foundations often crack in the grout joint between blocks. Even poured concrete or ICF walls can develop shrinkage or settling cracks in addition to water channels from anchor bolts and form ties. Honeycombing due to improper vibration and consolidation is another source of leakage, wherein the concrete aggregate became separated leaving voids in the wall. In addition, poured walls often have seams between different stages of the pour. Another problem exists with many of the older foundations that are constructed of various sizes and shapes of cut granite and round fieldstone. With or without mortar between, these foundations typically exhibit numerous passages for water to follow. Water can enter walls around utility penetrations such as sewer, water, gas or electrical conduits. There are several instances where I’ve been engaged to dig around existing buildings and to waterproof walls and/or install drainage systems only to discover that the actual problems were unrelated to groundwater.
Condensation
The effects of condensation can be as devastating to a home as water leakage, causing rot, mold, mildew and generally disgusting and, possibly unsafe conditions. (I have seen mushrooms growing inside on occasion). Since so many local dwellings in remote areas are vacation homes, many are lived in only a part of the time. This can mean inadequate ventilation (as houses are closed up much of the time) which is often aggravated by colder-than-normal internal temperatures. Many of these homes are only heated to just above freezing during much of the winter, if at all. When folks arrive for the summer, they open the house, letting in warm, humid air that condenses its moisture against cool basement surfaces. Perhaps the best solution for this is to have the house opened earlier in the springtime, allowing the basement temperature to equalize. Air conditioning can also help, but at least one basement drainage expert warns that dehumidifiers may actually cause more damage to basements. Written by Russell H. Lanoie, Rural Home Technology at www.ruralhometech.com
In Ontario Arc Fault Circuit Interrupters have been required for use in bedroom outlets since 2002. They are not required for lighting circuit or anywhere else in home.
Arc Fault Circuit Interrupters (AFCIs) are special types of electrical outlets and circuit breakers designed to detect and respond to potentially dangerous electrical arcs in home branch wiring.
How do they work
AFCIs function by monitoring the electrical waveform and promptly opening (interrupting) the circuit they serve if they detect changes in the wave pattern that are characteristic of a dangerous arc. They also must be capable of distinguishing safe, normal arcs, such as those created when a switch is turned on or a plug is pulled from a receptacle, from arcs that can cause fires. An AFCI can detect, recognize, and respond to very small changes in wave pattern.
What is an arc?
When an electric current crosses an air gap from an energized component to a grounded component, it produces a glowing plasma discharge known as an arc. For example, a bolt of lightening is a very large, powerful arc that crosses an atmospheric gap from an electrically charged cloud to the ground or another cloud. Just as lightning can cause fires, arcs produced by domestic wiring are capable of producing high levels of heat that can ignite their surroundings and lead to structure fires.
According to statistics from the National Fire Protection Agency for the year 2005, electrical fires damaged approximately 20,900 homes, killed 500 people, and cost $862 million in property damage. Although short-circuits and overloads account for many of these fires, arcs are responsible for the majority and are undetectable by traditional (non-AFCI) circuit breakers.
Where are arcs likely to form?
Arcs can form where wires are improperly installed or when insulation becomes damaged. In older homes, wire insulation tends to crystallize as it ages, becoming brittle and prone to cracking and chipping. Damaged insulation exposes the current-carrying wire to its surroundings, increasing the chances that an arc may occur.
Situations in which arcs may be created:
electrical cords damaged by vacuum cleaners or trapped beneath furniture or doors.
damage to wire insulation from nails or screws driven through walls.
appliance cords damaged by heat, natural aging, kinking, impact or over-extension.
spillage of liquid.
loose connections in outlets, switches and light fixtures.
Where are AFCIs required?
Locations in which AFCIs are required depend on the building codes adopted by their jurisdiction. Inspectors are responsible for knowing what building codes are used in the areas in which they inspect.
The 2006 International Residential Code (IRC) requires that AFCIs be installed within bedrooms in the following manner:
E3802.12 Arc-Fault Protection of Bedroom Outlets. All branch circuits that supply120-volt, single-phase, 15- and 20-amp outlets installed in bedrooms shall be protected by a combination-type or branch/feeder-type arc-fault circuit interrupter installed to provide protection of the entire branch circuit.
Exception: The location of the arc-fault circuit interrupter shall be permitted to be at other than the origination of the branch circuit, provided that:
The arc-fault circuit interrupter is installed within 6 feet of the branch circuit overcurrent device as measured along the branch circuit conductors, and
The circuit conductors between the branch circuit overcurrent device and the arc-fault circuit interrupter are installed in a metal raceway or a cable with metallic sheath.
What types of AFCIs are available?
The four most common types of AFCIs are as follows:
Branch/feeder—installed at the main electrical panel or sub-panel.
Outlet circuit—installed in a branch-circuit outlet.
Combination—complies with the requirements of both the branch/feeder and the outlet circuit AFCIs.
Cord—a plug-in device connected to the receptacle outlet.
Nuisance Tripping
An AFCI might activate in situations that are not dangerous and create needless power shortages. This can be particularly annoying when an AFCI stalls power to a freezer or refrigerator, allowing its contents to spoil. There are a few procedures an electrical contractor can perform in order to reduce potential “nuisance tripping,” such as:
Check that the load power wire, panel neutral wire and load neutral wire are properly connected.
Check wiring to ensure that there are no shared neutral connections.
Check the junction box and fixture connections to ensure that the neutral conductor contacts a grounded conductor.
Arc Faults vs. Ground Faults
It is important to distinguish AFCI devices from Ground Fault Circuit Interrupter (GFCI) devices. GFCIs detect ground faults, which occur when current leaks from a hot (ungrounded) conductor to a grounded object as a result of a short-circuit. This situation can be hazardous when a person unintentionally becomes the current’s path to the ground. GFCIs function by constantly monitoring the current flow between hot and neutral (grounding) conductors, and activate when they sense a difference of 5 milliamps or more. Thus, GFCIs are intended to prevent personal injury due to electric shock, while AFCIs prevent personal injury and property damage due to structure fires.
Gas Furnace and the Heat Exchanger. Your furnaces heat exchanger is the most valuable part of your furnace. The heat exchanger creates the separation of harmful gases and the warm air used for heating. The four main problems encountered with heat exchangers are Rust, Cracked, Clogged and Overheating.
Rust – This is by far the most common problem found with heat exchangers. Air conditioners and humidifiers mounted above the heat exchanger are two of the major causes of rust creation. A leaking air conditioner drip tray, a condensate line leak, both of which can cause rust and eventual failure of your heat exchanger. Humidifiers are by far the most common source of rust in your furnace. Cheap design and hard water, coupled together, create the perfect match for allowing moisture and water into your furnace. The common drum humidifier which rolls through a tray of water, the level of which is controlled by a float, commonly gathers calcium and other hard water particles, which then causes the float to fail and water enters your furnace. The majority of humidifiers I inspect have no inside parts and the water line has been disconnected or turned off. The cold air return plenum usually has signs of water leakage from the humidifier down to the furnace. This is always an indication that a furnace technician should be called in to throughly inspect the heat exchanger. A visual inspection can not be relied on to detect all possible damage and partial dismantling of the furnace is usually required.
Cracked – Furnaces can be damaged by careless shipping or by being dropped by the installer. This can lead to a cracked heat exchanger that would not be visible to the naked eye or casual visual inspection. High temperatures can also cause cracks in the heat exchanger or maybe a faulty casting or fault in the alloy.
Clogged – This condition is usually caused by accumulation of condesate or soot. Having flue passages cleaned in high efficiency furnace heat exchangers can be a very expensive process.
Overheating – One of the common causes of overheating is the lack of air flow across the heat exchanger. Having a new furnace installed without ensuring adequate duct sizing is a common cause of this problem. Always ensure work is done by competent technician who will ensure duct size and fan blower is adequate for the furnace being installed.
Regular Maintenance will prolong the life and efficency of your furnace. Annual maintenance is the least recommended time span between cleaning and tune-ups. Save your self money and un-needed agravation by having your furnace seviced by a qualified professional.
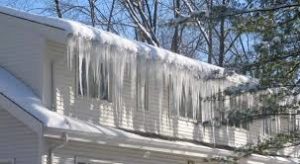
With the winter season almost upon us it is time to discuss the re-occurring ice dams that frustrate many home owners. So lets start with the educational segment first.
Ice Dams are created when you have fairly large snowfall and the snow melts and re-freezes before being channeled away from your roof. This is usually caused by a warmer roof surface than the exterior temperature. This simply means that the temperature of your shingles is slightly above freezing when the outside temperature is below freezing. The “warmer” your roofs temperature is translates to larger ice dams. Non-functioning eaves troughs can also cause ice dams on your roof. Improper pitch or blockage due to debris etc will cause the appearance of ice dams. If you see heating cables on eave of roof it is a pretty good indicator that there is a problem with insulation or ventilation.
Poor ventilation and insulation is the common cause of most ice dams and is the culprit for creating a “warm” roof in the winter months. Heat escapes from your heated living space and gathers in your attic. (Remember heat rises) Poor ventilation does not allow for the removal of this heat which remains trapped in your attic.
So now we have the 3 basic requirements to start building our ice dam. In review they are:
1. Snowfall
2. Heat leaking into attic area.
3. Poor ventilation allows accumulation of heat in attic.
We are going to address the heat leaking into your attic and then the poor ventilation.
Insulation
During most of my inspections in the Barrie, ON area I have come to notice one insulation deficiency that appears over and over again. People, either themselves or hired contractors, enter the attic to do work and never repair the damage they have done to the insulation. Most of my clients have never been in their attics and just assume that all is well. Pot lights are almost always an indication that someone has been in the attic and maybe it is just bad percentages but over 75% of homes I inspect have large trails in their blown in insulation and areas where instead of 10 to 11 inches of insulation, only 3. There was even a popular franchise inspection company that “bragged” that they put a “tag” in every corner of your attic. When two thirds of your R factor is missing from areas of your attic you can safely assume that you will have heat escaping into your attic. You don’t need to hire a home inspector to check your attic; most attics can be completely viewed from the access hatch with a standard spot light.
So I would suggest to anyone out there that has an ice problem, that they first check their attic for missing insulation or un-even coverage.
Ventilation
The Ontario Building Code requires 1 square foot of ventilation for every 300 square feet. Twenty-Five percent of this ventilation is required at the bottom of your roof (soffits) and Twenty-Five percent at the top(peak). The remaining fifty percent can be spaced anywhere on your roof although most designers simply just put venting at your soffits and upper roof areas.
One main area of concern in ventilation is the soffit venting. As your roof rafters or trusses come down to your walls the area becomes very restricted and the building code even allows for lesser R values in this area do to space restrictions. Soffit baffles are used to prevent the insulation from completely blocking air flow from your soffits, thus allowing for air flow from your soffits through to your roof vents allowing for any humidity and heat to be dissipated to the exterior. I have seen homes in the Barrie area that the homeowner has taken the trouble to stuff insulation along their soffits thereby completely blocking all ventilation. Another frequent insulation blunder is people who insulate their garages and add an auxiliary heat source but totally ignore the fact that a garage is built with no ice shield on eaves and usually has no roof ventilation.
Once again a simple visit to your attic will ensure that you have adequate ventilation. Most soffit baffles are either plywood sheets extending down to walls or the popular Styrofoam soffit baffles. Usually they are installed in every third or fourth joist or truss space.
French Drains or similar devices have become popular for the disposal of downspout discharges around homes. I always recommend that home owners install a Tee at the top of their drainage pipe to prevent winter freezing problems. Water in your eaves and downspouts will always freeze at some time during the winter; the problem arises when the sun comes out and melts the ice in eaves troughs and downspouts but fails the thaw the underground drainage system. This is where the added Tee relieves the system by allowing the thawed run off to spill out the Tee, thereby prevent the splitting of downspouts and the possible creation of “ice dams”.
Caveat Emptor: Buyer Beware: It is the home owners duty to research information prior to making a purchase. A knowledgeable consumer is a smart consumer. I try to convey this message to all my clients and protential clients so that they may better protect themselves.
Fallacy: Some consumers assume the Ontario New Home Warranty Program (ONHWP) offers blanket warranty coverage.
Truth: For a fee, new home buyers receive a (comprehensive) financial and construction defect warranty.
This warranty program provides $100,000 total maximum coverage on each home or condominium unit and deposit loss, not exceeding $20,000. It also offers protection against delayed closings, delayed occupancy and substitutions made without your agreement if the items of construction or finishing were specified in the agreement of purchase and sale. Remember to read the fine print, new home builders often have escape clauses allowing them to delay delivery of new home if they run into problems.
New home owners are supposed to receive a one-year warranty against defects in work materials and Ontario Building Code violations. Often they will hardly do anything if it involves a lot of work or replacing a product. For example I have seen many wood stairs with filled holes from wrong placement of guards and the builder refused to do anything even though plugs were clearly visible.
For homes enrolled on or after Jan. 1, 1991, the builder provides a two-year warranty against: water penetration through the building envelope including the basement or foundation walls; defects in the electrical, plumbing and heating delivery systems; protection against health and safety Ontario Building Code violations. Materials and work in the exterior cladding, caulking, windows and doors must also be defect free.
New homes enrolled on or after Jan. 1, 1991, have major structural defect coverage lasting for seven years while homes enrolled before that date are covered up to five years.
Fallacy: Many home owners believe the warranty program’s warranty coverage has an unlimited time period. Unfortunately, new home owners only realize their mistake after they lodge a complaint of claim when the warranty on the particular problem has expired.
Truth: New home owners should document all problems in writing before the warranty period ends. The warranty program can not pay claims if we don’t have notice of the problem within the warranty time lines. Forward copies of this documentation by registered mail to the builder and the warranty program. Home owners should note giving notice on the Certificate of Completion and Possession is not sufficient
Truth: Always get all your defects and missing items on your Pre-delivery Inspection Document. Some builders try and persuade home owners to wait and list items on their 30 day list, but then you have been in the home for a month and there could be some conflict as to when the damage or defect occurred. I have encountered this many times and my best advice is to always list everything on your Pre-delivery Inspection.
Truth: Since the program’s warranty coverage is transferred with title and does not remain with the owner, some resale homes are covered by warranty. The program’s coverage takes effect from the date of possession and remains in effect on the house or condominium unit even if it is sold before the end of the warranty period to a new owner.
Fallacy: Once they move into their new abode, home owners can sit back and let their new home warranty work for them.
Truth: Proper maintenance of a new home not only protects a home owner’s major investment but ensures they receive all the warranty coverage offered by the warranty program. Problems caused by home owner neglect, such as allowing caulking to wear down leading to moisture damage, are not covered.
Fallacy: Home owners who encounter problems in the homes only need to contact their builder. Fact: If home owners discover a problem they should fully document it in writing and send it to the builder and a copy to the warranty program prior to the end of the warranty period. This documentation defines and dates the defect. In your letter describe the problem and ask the builder to correct it. Include the home’s enrolment number, the complete address, the lot and plan numbers or the condominium address and unit number.
The warranty program will stand in the builder’s shoes if the builder is unable to correct the defect.
Fallacy: Some new home buyers, lawyers and real estate agents believe that HUDAC still exists.
Truth: The acronym HUDAC stands for the Housing and Urban Development Association of Canada, an organization founded in 1971. It administered the voluntary warranty program until 1976 when the provincial government passed the Ontario New Home Warranties Plan Act making the program mandatory. HUDAC continued until 1983 when the program took on its new name, the Ontario New Home Warranty Program.
The facts regarding the program and new home warranty are explained in the booklet, What Every New Home Buyer Should Know but you should talk to a professional and at least get some advice for free even if you don’t want a complete inspection.
Tarion CEO asked to Resign
Canadian News has reported that the Auditor General has asked CEO of Tarion to Resign
Created 43 years ago to help buyers of new construction homes, the Ontario government now says Tarion Warranty Corp. has become an agency that favours builders over consumers and has subsequently asked the company’s CEO to step down.
“I want to be clear, this is going to be a major overhaul,” the Minister of Government and Consumer Services Lisa Thompson said Thursday.
When a new home buyer had a problem, they could go to Tarion for help, but the auditor general’s report released Wednesday slammed the home warranty program, saying it was spending millions of dollars on bonuses for its executives but not paying attention to disputes raised by new homeowners.
Between 2014 and 2018, almost 9,700 requests to Tarion for help from consumers were dismissed because of restrictive deadlines.
“We have heard loud and clear that real, meaningful change is needed to the way we administer and enforce and Ontario’s new home warranties and protection program,” Minister Thompson said.
In proposed legislation released at Queen’s Park on Thursday, the government said it wants to restore consumer trust, reduce the influence of builders, make the program consumer-focused and enhance the dispute resolution process.
The minister also said the board would no longer be stacked with builders and developers.
“The proportion of new home builders and vendors on the board will be limited to no more than one third,” Thompson said.
The NDP Critic for Consumer Protection issues, Tom Rakocevic, said that the changes are a long time coming. “Buying a new home should be a dream and not a nightmare and new home buyers need existing warranties to be honoured fairly,” Rakocevic said.
The government had previously announced that it would establish a separate regulator for new homebuilders — something that has been handled by Tarion, and which critics have called a conflict of interest.