Water Problems and Solutions for Home Owners
– Most water problems that homeowners encounter can usually be by controlling water above ground. Simple but effective means of controlling those above-ground problems may prevent structural damage to your home as well as dry up those basement damp areas. Most home owners are un-aware that saturated soil increases the soil pressure on the basement wall which can the lead to cracks, shifts, collapses and other structural problems. Start first by looking to the roof,. An inch of water on 1,000 square feet of roof amounts to about 623 gallons of water. A foot of compacted snow on that same roof could contain up to 4 inches of water, or nearly 2,500 gallons. Getting all that water away from the house is a big first step to preventing basement problems and can prevent needless costs in repairs. Ensuring your eaves trough have extension or splash pads that adequately remove water from around your house is the first step in preventing water intrusion or damage to your home. A slope of about 1 inch per foot drainage near the foundation wall is usually adequate. Also, the ground should be sloped to carry the water away from the downspout discharge.
In addition to proper drainage above ground, a properly installed drainage system below ground is important to keeping your basement dry. A properly installed drainage system at the house foundation will prevent many water problems from entering your basement and eliminate saturated soil conditions next to the wall. A study of leakage problems showed that more than 90 percent were due to improperly installed drainage systems. The engineer says a properly installed foundation drainage system includes drainpipes placed alongside the footing. In areas with high water tables, a drainage system can also be installed around the inside of the footing and under the basement floor. Using granular material to allow the movement of water and filtering material to keep soil from plugging drain pipes is essential to keeping the system functioning for the life of the house. Granular backfill should be used next to basement walls, he notes. Using soils that don’t drain well can cause pressure on the walls if the soils become saturated. Most contractors now use a dimpled wrap installed against the foundation ensuring water drains down to weeping tile thus preventing hydraulic pressure from building against foundation walls. Poor drainage will also increase the potential for moisture or water vapor to move through the wall into the basement.
In certain areas, that moisture can carry minerals that are detrimental to the concrete. Basement walls that have had water or moisture leaks will usually leave an effervescent stain which is typically non-removable. Homeowners and home inspectors always view effervescence as indication of water penetration.
Window wells also need to be correctly constructed with drains linked to the foundation drains. Soil elevation in the window well should be several inches below bottom of window and sloped to the drain. The cost of installing the drainage system during new construction is minimal and is minimum building code requirement. As a home inspector window wells are usually an area where there is some deficiency that is noted on inspection report.
Window drains are usually installed in two ways; one is to place window well drain on top of foundation weeping tile and then fill with clean stone, thereby preventing entry and possible blockage from debris; two is to connect window well drain with Tee into foundation weeping tile and close off top of window drain with mesh sock or other means of preventing debris entry. As a home inspector I find many window well drains that are open and partially filled with leaves and toys etc. A blocked window well drain will allow build-up of water in heavy rain or snow melt and could enter basement windows.
Many homes have in ground drains for roof drainage discharge. These usually work well in warm months but in winter they are prone to freezing. I always recommend to my clients that they install a Tee at the top of ground drain which will serve as run off if ground drain is frozen but water is melting on roof. As the ground is the last are to un-thaw water will back up downspout and then freeze at night, installing a Tee will prevent this.
Professional home inspectors can identify problems and potential problems before buying a house or before major and expensive repairs are required. Always check your home inspectors qualifications prior to hiring, CAVEAT EMPTOR – BUYER BEWARE
Painting the Foundation Tips. Foundation painting can improve the appearances of a house. Rather than leaving the home setting on a boring gray foundation, the owner can pick virtually any color of the rainbow to coordinate with the remainder of the home. There are a few tips for the best results, so keep these in mind.
Wait for Concrete to Cure Before Foundation Painting
The concrete needs time to cure before the very first painting. Painting professionals recommend giving the material a minimum of two years of curing time prior to the first paint job. Newly poured concrete is very acidic in nature, but as time passes, the acid in the material reacts with carbon dioxide in the atmosphere to neutralize the concrete. Painting over the surface too early will only lead to blistering and peeling paint, offering the foundation an undesirable appearance.
Preparation for Foundation Painting
Prepare the foundation by using a shovel to pull dirt away where the concrete meets the ground. This allows you to paint without dirt entering the roller or brush. Weeds ought to additionally be removed as they can cause problems when applying paint.
Cleaning Prior to Foundation Painting
Some foundations may be grimy, have moss growing on them or have peeling paint. Most dirt can be washed away using a garden hose with an attached spray nozzle at an extremely hard pressure setting. In some instances it may be necessary to scrub the surface using a wire brush or broom. If using these tools provides, a pressure washer may be useful. The pressure washing machine is additionally useful at blasting away peeling paint and moss growth. Once the surface is clean, allow for drying of the concrete prior to applying paint. If you used a pressure washing machine, allow a minimum of one week for drying.
Applying the New Coat of Paint
Once the foundation has time to dry, start painting. On foundations made of concrete block, paint the joints first using a brush and then paint the rest of the foundation using a roller. On poured concrete foundations, start with the roller. If the foundation has never ever been painted before, the first coat may call for a significant amount of paint. Primer is readily available and can be used for the very first coat. Once the first coat has finished drying, apply the second coat and allow to dry. A brush can be used to cut in the edges and the top where the foundation meets the rest of the house.
Foundation painting can give a home a much more finished appearance. If the foundation is stained or made from stone that no longer match the rest of the residence, paint can quickly improve the property to make the house look much better with greater curb appeal.
Solving Basement Water Problems. Many “how-to” magazines run articles touting miracle products that stop water from permeating through foundations or basement walls and floors. While some products may be effective at mitigating water migration through cracks or flaws in a wall, blocking groundwater can be as tough as keeping water from leaking through split seams of a wooden boat. So long as any part of the boat is in the water, a certain amount of water is bound to find its way inside.
Never wait until water enters the basement or permeates the foundation before treating the root cause. The resulting dampness is both distasteful and potentially dangerous, even if there is no noticeable standing water.
There are four ways that moisture can permeate foundations or enter and collect in basements:
High groundwater table Surface (rain)
water leaking through openings or flaws in the walls Condensation Broken plumbing and/or irrigation runoff High Groundwater Table
Wet basements are a very common problem, particularly in low-lying areas or mountains where high water tables are common. This means that the ground water level has risen up to its high point for the year due to melting snow, spring rains, lack of water pickup by the trees and plants, and the absence of sun to dry the ground during the winter. Some soils such as clay bind water tightly, keeping the water table high for extended periods. Porous soils including sands and gravels pass water quickly, yet often have high springtime water tables, especially in low areas due to excess springtime runoff. Unfortunately, many homes are built with inadequate protection from groundwater, even though site conditions may be well suited for the proper installation of a simple and cost-effective drainage system.
Once a water problem is discovered after a house is built, it is very difficult and expensive to remedy. If left unchecked, structural and health-related problems may persist. Excessive moisture not only results in a musty smell or damage to carpet and wood flooring materials, but it promotes growth of mold spores, which can result in asthmatic symptoms in many people. For this reason, the use of vapor barriers under slabs as well as other drainage techniques are essential to keeping your home dry year-round.
To help illustrate the high groundwater problem, imagine a 12″-high pile of sand in the middle of your bathtub — with six inches of water in the tub around it. If you were to dig a six-inch-deep hole in the sand, you would find water at the bottom of the hole. By adding more water to the tub, the water level in the hole would rise as the surrounding water reached equilibrium due to hydrostatic pressure. This simulates the effect of a higher water table acting on a foundation. Now, inserting a watertight box into the hole would cause it to float. If there were holes in the box, water would seep inside. In this analogy, the box is the basement or foundation, and the tub water is groundwater.
Wrong Culprit
Years ago I did a job for a homeowner who insisted that her basement became wet only after a rainstorm. After lots of digging and waterproofing, (and continued water in the basement) I was left with a serious question about the real source of the water. Finally I started checking the house plumbing and discovered a leak in the water heater! I’ve learned to more be suspicious.
Keeping Water Out Ironically, making residential basements absolutely watertight can lead to other problems if not properly engineered. For example, basements of many commercial buildings in highly developed areas are built watertight.
However, their construction costs are extremely high compared to typical residential basements because their foundations and floor systems are built to far more stringent specifications. This is not only to keep water out, but to keep the high pressure of outside water from causing structural damage.
Consider this real-life situation that occurred a few years ago: During one extremely rainy night, a family awakened to a strange sound coming from their basement. Apparently, excess rainwater had saturated the ground around their home given its location in the lowest section of their development. The extreme pressure from the accumulated ground water actually buckled up the basement floor, causing the soil from under the floor to erupt six feet, covering their washer and dryer. The sudden soil displacement undermined the overall foundation, causing one of the walls to fall over a foot. The house was abandoned for massive structural repairs. Although this is an extreme example, it demonstrates the powerfully destructive force of water. This foundation was built in a manner similar to many residential basements. Yet, by allowing the groundwater pressure to rise without relief, failure resulted in the weakest part of the structure which, in this case, happened to be the concrete floor. Ironically, if homes were absolutely watertight, they might even float like the box in the bathtub, resulting in an unstable structure.
Current building codes require homes have sump pumps to discharge out any water that might leak in which could otherwise damage the basement. Fortunately, as water is pumped out of the basement, the water table around the house is lowered, (like pulling the plug on the bathtub drain) relieving the “hydrostatic” pressure. This is why floating houses or erupting floors are rare.
One effective way to check the water table near a house which has a dug well is to uncover the well and measure the depth from the ground surface down to the water. Compare this depth to that of the basement floor below grade and the difference equals the depth to which the basement would flood if the water were not removed. Even if the house is located on sloping terrain, the water table remains approximately the same distance down from place to place as groundwater tends to follow the contour of the surface.
Perimeter Drains
In many situations, particularly in mountainous regions where the land is seldom flat, it is possible to drain water away from most foundations and basements by gravity rather than by pumping. The traditional method specifies a perimeter drain around the outside of a building during its construction. The drain outlet slopes downhill away from the house until it reaches the surface of the ground where it can freely discharge by gravity flow. The advantage of this method over pumping water out of a sump is that it lowers the water table around the house, preventing water from ever reaching the cellar in the first place.
In many instances where experts have been asked to troubleshoot wet basement problems, a common finding is drain pipes that were installed above the foundation footing, which allows water to rise to the level of the floor. If the builder made the additional mistake of installing the drain pipe with the weep holes facing up, then the level of water has to rise to the top of the pipe before the pipe can pick up any water. Other times there is little or no porous bedding material and pipe inlet holes can become plugged. Another problem occurs with large bedding stone. Migration of the original soil into the bedding plugs up the stone, leading to failure. Often a combination of problems may coexist.
Conventional perimeter drains are usually constructed with 4″ pipe laid at the base of the footing. Most contractors use 1 1/2″ crushed stone around the outside of PVC or thinwall perforated septic system pipe which has 1/2″ or 5/8″ holes every few inches. Usually this is entirely satisfactory, though in some cases capillary action (wicking) within the soil can make the basement floor damp even though it is a few inches above the artificially lowered water table.
Due to the severe conditions encountered when building a home several years ago, the following example illustrates an improved method. Just as sitework started, the property was deluged with rain. The rain aggravated an already difficult groundwater situation, threatening postponement of construction. However, with patience (and a good pair of rubber boots), perimeter drains were installed four feet outside of where the house was to be located. Within days of installing the drains, excavation for the basement was able to proceed as if it were a dry summer. The home is built into the ground about six feet deep on a gently sloping hill. Several years have since passed and the home has never been bothered by moisture in the basement. This is in spite of the original springtime water table just two feet below the surface of the ground. This same procedure is excellent for drying out existing wet basements where conditions permit.
Ensuring Effective Drainage
The first consideration is setting the drain pipe deep enough to lower the water table well below the floor in order to reduce the effects of capillary action (wicking). Another way to reduce this effect — generally limited to new construction — is to install a layer of crushed stone entirely under the basement floor. Water cannot “wick” through this coarse aggregate. Although this is more costly, it is good insurance for a dry basement. Alternatively, installing the drain pipe a little lower may be a very cost-effective alternative, assuming there is sufficient side hill grade to ensure gravity discharge well away from the structure.
For new construction and retrofit situations, place the drain pipe a foot or more lower than the footing whenever possible and far enough away to avoid undermining the foundation. Generally 2′ to 4′ or even more is necessary to protect landscaping or porches and similar structures. In retrofit situations, installing a drain on the upgrade side of the house can yield a significant improvement, as it is usually only necessary to intercept water moving through the ground toward the house to eliminate the moisture problem. This type of drain is considered a “curtain drain” rather than a footing or perimeter drain, especially if it is several feet from the house. Its job is to lower the water table downgrade in order to protect the house. The curtain drain method is an important consideration particularly for retrofit installations as it can reduce site disruption and the resulting cost of excavation.
some checking and told the folks that a gravity drain could probably solve the problem. They went ahead and had one installed and have had no more trouble with unexpected flooding or pump maintenance since. What is surprising is that it took a college education and several years in the construction field before I was able to make such a simple and obvious recommendation. Yet I know of similar situations that exist today, and houses that are being built where sump pumps are expected to do what could have been done with a few pieces of pipe and some planning. Many basement drainage companies still rely on sump pumps for all installations, regardless of whether or not gravity could be used to discharge the water. This creates a long-term dependence on a mechanical device. Sump pumps can get plugged up, wear out, fail to come on after months of non-use, or stop because of a power failure. Unfortunately, it is often during the worst weather conditions when power is lost in rural areas while, at the same time, excessive rainfall is causing the water table to rise. About the only assured way to protect a basement is to install a redundant pump and a separate circuit coupled with a battery-powered back-up system that automatically kicks in when all else fails. Such systems are now on the market but represent additional investment and occasional maintenance to keep them in working order. They use an automotive-type battery for power, similar to safety lights in public buildings. If there is no choice but to install a sump pump, selecting the right pump should be based on the severity of the situation. There are many types market, but the extra money spent for a high quality submersible style with a built-in switch is well worthwhile, especially in extreme situations. Excessive dampness can quickly corrode unprotected motors on pedestal pumps and a power failure that allows water to completely cover an unprotected motor can require replacement of the entire pump. Also, there are automatic switches now available that allow sump pumps to draw water down to within a fraction of an inch of the floor and to turn on when water is only slightly deeper. This can be helpful for occasionally dewatering a basement without digging a sump hole through the concrete floor. Filter Fabric: Synthetic cloth-like material that is used for several different types of construction related applications such as erosion control, road stabilization and soil separation. Can consist of either woven or non-woven fibers in varying thicknesses or weights. Available in 12 to 15 foot wide rolls several hundred feet in length. Woven fabrics (usually black) resemble the stuff that modern day grain bags and weed control fabric are made from while non-woven fabrics can resemble a range of materials from soft felts to the stiff shiny house wrap (to which they are closely related) usually seen enveloping homes under construction.
Maintenance
It is essential to keep the drain outlet running freely. The rodent guard must be kept clear of any debris. The area below the outlet must be kept cleared of leaves and debris, especially if the drain empties into a ditch. Sometimes drains that have clogged up internally can be cleared by the use of a pressure washer (or even a garden hose) to break up the clog. I’ve cleared obstructions from perimeter drains and had water drain out of the basement just like water leaving a bathtub.
Properly installed perimeter drains create an “island” out of the house site by lowering the water table completely around the house. They keep water from entering under the footings and, in my experience, provide the surest protection against any type of dampness in a basement resulting from groundwater.
There are some situations where perimeter drains are not necessary, however. A thorough knowledge of the site, or an exceptionally low water table indication from a septic system test pit, can provide such a determination. If you happen to be one of those folks already blessed with an unwanted indoor swimming pool each Spring, whether in a new or existing house, rest assured that there usually is something that can be done. However, since soil conditions vary so greatly, it is wise to consider your circumstances carefully before deciding on a course of action.
Also see the University of Minnesota Extension Bulletin Moisture in Basements: Causes and Solutions Filter material: According to the American Iron and Steel Institute’s Handbook of steel drainage and Highway Construction Products, 1967: “Early subdrains consisted of a trench filled with coarse rock (“french” drains) which quickly silted up. Extensive research by the U.S.Waterways Experiment Station at Vicksburg, Mississippi, shows that a graded material roughly equal to concrete sand (AASHO Specs) has been found most suitable. Such material gives better support to the sidewall of the trench and thereby reduces erosion and silting. Filter material should be placed in layers and tamped.” Leaks in Foundation Walls Another condition that can sometimes appear to be high ground water leaking in may simply be surface water entering over or through the foundation at bulkheads or window openings, seams between walls, and/or, flaws in the foundation.
Poor surface grading can direct water toward the lip of a bulkhead or towards basement windows where it can spill over into the basement. By not paying attention during heavy rains, a homeowner can sometimes end up blaming the wrong culprit.
Surface water leakage
Surface water leakage is reasonably easy to locate once you get on track. The solution often involves regrading to drain water away from the foundation. In the case of foundation windows, however, it is not always possible to shed water away since the bottom of the windows are often too far below the adjacent ground, requiring the installation of window wells. These often consist of corrugated galvanized steel half circles but can also be made of pressure treated wood or masonry. The goal is to make the top of the window well high enough to be able to slope the surrounding ground surface away from the house. A problem arises when the window well is directly below the roof drip, especially in cold, wet climates where rain gutters are seldom used (because snow and ice fills them, making them useless, or ripping them from the building!)
The solution is either to cover the window well with a clear plastic dome which also keeps out leaves and critters or to create a mini-drywell under the window well to allow rainwater to soak away into the ground before it can rise up and find its way through the window. This leads to another issue: porosity or flaws in the wall itself. If a foundation wall is totally watertight there is little problem with letting water run down against it all the way to the perimeter drain. If the wall has had adequate damp-proofing and/or the water drains quickly through the soil, there is little to be concerned about. The problem is that many foundations are have defects and hairline cracks which allow water infiltration.
Sources of Leaks in Foundation Walls
Concrete block foundations often crack in the grout joint between blocks. Even poured concrete or ICF walls can develop shrinkage or settling cracks in addition to water channels from anchor bolts and form ties. Honeycombing due to improper vibration and consolidation is another source of leakage, wherein the concrete aggregate became separated leaving voids in the wall. In addition, poured walls often have seams between different stages of the pour.
Another problem exists with many of the older foundations that are constructed of various sizes and shapes of cut granite and round fieldstone. With or without mortar between, these foundations typically exhibit numerous passages for water to follow. Water can enter walls around utility penetrations such as sewer, water, gas or electrical conduits. There are several instances where I’ve been engaged to dig around existing buildings and to waterproof walls and/or install drainage systems only to discover that the actual problems were unrelated to groundwater. Having been under the direction of an architect in some cases, I’ve had to follow his recommendations rather than follow my instincts to determine the problems.
Consider this example that involved an old house with a loose stone foundation. The original work that was done under the direction of the architect only aggravated the wet basement problem. Digging a shallow perimeter drain actually allowed more water through the porous basement wall. This was the same mistake many people make when they dig out next to their foundation wall and replace the original backfill with crushed stone either for appearance and splash protection. Putting crushed stone directly over the original soil, even with the installation of a perforated drain pipe often causes more water to enter the ground. The crushed stone becomes a dispersion system in the same way it does in a septic drain field. Usually little water enters the drain pipe, except in a deluge, and more water soaks into the ground next to the foundation where it makes its way into the basement.
What I did to solve the problem was to seal the outside of the wall with a coating of concrete that directed surface water away from the foundation as it soaked into the ground, keeping it from streaming through the loose stone foundation. The addition of a bituminous asphalt coating or a Bituthene membrane can also help to keep water from penetrating the foundation wall. The success with this project has prompted me to use this technique in many other situations. Rather than using concrete, however, in most cases I rely on a layer of rubber or plastic to direct water away from the wall. Usually I excavate just a few inches below the surface next to the building and three to four feet lower at a distance of four to five feet from the wall, sloping the soil down on a 30 to 45 degree angle away from the building as I go. I rake the earth smooth, remove all rocks and sticks, and tamp it firm. Then I install a layer of rubber or a couple of layers of 6 mil polyethylene over the slope, right up to the wall. I don’t usually worry about sealing against the wall, as my primary concern is to direct the majority of the surface water away from the wall and out into the earth where it can soak harmlessly away, leaving a “dry zone” beneath the membrane next to the wall. I use this same technique under a window well if there is any question about the integrity of the wall below the window. I dig out a few extra feet, slope the soil, install the plastic membrane on the slope, place crushed stone as a mini drywell for any rainwater that may enter, install the window well structure and then backfill to the surface as discussed.
This technique of installing a membrane just below the ground surface is similar to installing “flashing” around a chimney or other structure on a roof. One of its biggest benefits is that it can eliminate the need to completely excavate a foundation wall all the way to the footing and attempting to waterproof it. It is somewhat similar to installing a full length “splash block” mentioned in other basement drainage articles on the Internet except that it is out of sight. I’ve also had success with this technique even when attempts to make the wall watertight below have failed.
Improve Your Lot Drainage
How much water do you think comes off your roof in a heavy rain storm? Take a typical 1500 sq ft home and a rain storm that drops one inch of rain, this is equal to over 900 gallons of water. This water, all 900 gallons, leaves your roof by following your gutter system and down through downspouts to the ground. This is where most homes are sadly lacking.
Many homes have missing elbows on downspouts, which would allow water to run straight down your foundation. If you have a basement, this can lead to damp walls or even water entry into basement. Once water has created a path it will tend to follow the same path unless remedial methods are used to re-direct it.
Every downspout should have an elbow and extension directing water away from your home. Water is the worst enemy of your home. Concrete pads are great; just remember to install them with the open end pointing away from your home. Unbelievable, but I have come across numerous cases where these run off pads were installed like a dam, with the open side butted against the wall. Wrong way; turn it around!
Small holes and depressions around your foundation should be filled and soil levelled to slope away from house. If installing patio stones or walkways along side of home, ensure that the y slope away from house. If a new house, increase slope away slightly to compensate for disturbed soil along side of house. This is very important because improper slope of soil around your home will direct water towards foundation year round. Eventually this will cause water damage to your home, spalling of concrete or water entry into your home.
Some homes have eaves troughs that discharge water across driveways and sidewalks. This can be dangerous to occupants and visitors in the winter season with ice being a problem. Diverting your run off underground is one solution to this dilemma. Ensure you run your drain lines deep enough not to freeze and that you have an adequate low spot to drain to. Another good tip is to install a tee above drainpipe connect which allows the water to flow out if drain line freezes. French drains are another option. This is just a barrel full of stone or gravel buried underground into which you water is directed.
Water is the number one enemy to your home, so ensure that is moved away from your home as quickly and efficiency as possible.
Brought to you by the Alliston Home Inspector
Roger Frost is a professional home inspector for Barrie Home Inspections and has many Do It Yourself Articles.
Repairing Your Homes Concrete Foundation
Concrete foundations are of two types – poured concrete and concrete block. Poured concrete is a modern manner of laying foundations, while concrete blocks are more traditional. Concrete blocks are preferred for their visual appeal and strength. Yet, as time passes, there may be degradation of concrete.
The prime cause of cracks in concrete foundation is seepage of water. Such cracks caused due to leakage of water are thin and hairline. They may widen over time, but they are present only in those areas where the seepage occurs. In order to repair leakage cracks, it is necessary first to investigate the source and the point from which the leakage originates. There may be other reasons for concrete foundations to crumble. Soil may lose its moisture content in summer. There may be underground roots which may wither and die. Such natural causes make the soil shrink and hence the foundation may move. Though this movement is gradual, overtime it will cause cracks to occur. These cracks will be large gaping ones, running across the entire length of the foundation. They may even be in the form of tiny holes in certain places. Whatever be the reason, cracks in the foundation are very perilous if ignored. Repair must be done as soon as possible.
Difficulties involved in the repair process are influenced by how big the cracks are. For tiny moisture created cracks, the repair is relatively simple and can be done by almost anyone. These cracks must first be brushed clean with a wire brush. A jet of water may be passed to remove any loose concrete particles within the crack. The crack is then allowed to dry completely and filled with concrete caulk. If the crack is large, then it is packed with patching materials that are specifically available for concrete. These patching materials must be wet when applied. They are limestone based, and they expand as they dry, filling up the crack completely. The finishing touch is to apply a sealant to the repaired crack. But if the crack is sinister and not the do-it-yourself kind, then it is most prudent to shell out a few dollars and hire some good repairmen. Such cracks occur due to rods which may have rusted inside and snapped or because of deterioration of the materials present within the concrete.
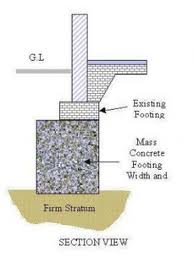
Some leakage cracks when ignored can also reach dangerous levels. Such cracks are more found in poured concrete. Contractors treat the concrete foundation with urethane injections to extract the embedded water. They may even excavate the area around the foundation and replace the faulty tile or construct a provision for the water to lose contact with the foundation.
Foundation Repair
The principal function of a foundation of a home is to transfer the weight of a structure to its underlying soil and rocks. One of the factors that bring about the need for foundation repairs is improper foundation settling. Foundation settlement can devalue structures and also render them unsafe. Building on expansive clay, compressive or improperly contracted fill soils and improper maintenance in and around foundations are some of the major reasons of improper foundation settling. Another reason for improper foundation settlement is undetected or unsuspected air pockets in the ground below the area of construction. These may cave in and cause the integrity of the foundation to be compromised.
General symptoms of a structure needing foundation repairs are bulging or cracked walls and doors that don’t close properly. Building on expansive soils is the main culprit for foundation settlement. When only one part of the foundation either settles or heaves, cracks are formed in the foundation.
The exterior warning signs of improper floor settling are rotation of walls, displaced moldings, cracked bricks and foundation and separation around doors and windows from the walls.
Interior warning signs of improper floor settling are cracks on the floor, sheet rock and misalignment in doors and windows. There are many ways of doing foundation repair. Cement, stone, steel or wood were used extensively in past techniques. They would be forced into the ground in a bid to salvage the strength of these foundations. However, this type of repair work has been known to be futile.
Two of the most successful ways of foundation repairs are slab jacking and the Piering method. Piering is also known as hydraulic jacking. Slab jacking is the process of adding grout beneath a slab or beam. This produces a lifting force and restores the said beam or slab to almost its original elevation and adds to its strength. Care should be taken that the amount of sand should be perfect while adding grout. During Piering, steel posts are driven through unstable soil. Hydraulic jacks are used to stabilize concrete slabs which are weakened due to the changes taking place in the underlying soil. Steel beams are used in the Piering method because concrete has great compressive strength. Though Piers are able to transfer huge downward loads without the help of reinforcing steel, steel is used in the piers for prevention of the pier from being pulled apart or sheared by forces of the expansive soils. The repairs normally take 21 to 30 days, however this time frame can vary depending on soil conditions and weather delays. This article is for general knowledge only, always consult with an expert regarding any structural design issues or faults.
The Barrie Home Inspector has inspected over 8,000 foundations. For more information on foundations or water penetration visit blog on home maintenance and tips.